Monday, June 29, 2009

Now is the time on Sprockets where we attack


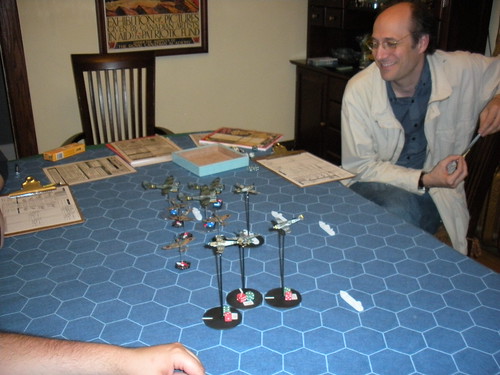
Last week the Conscripts assembled at Dallas' place for some 6mm WW3 action. The setting was an imaginary Soviet offensive into northern West Germany in 1988. The scenario imagined an ambitious West German commander (pictured above), tired of retreating, unleashing a counter-attack in the hopes of trapping the Warsaw Pact spearheads driving on Bremen. Dallas and Cam rolled with the West Germans while Bill and new conscript Chris took command of the commies.


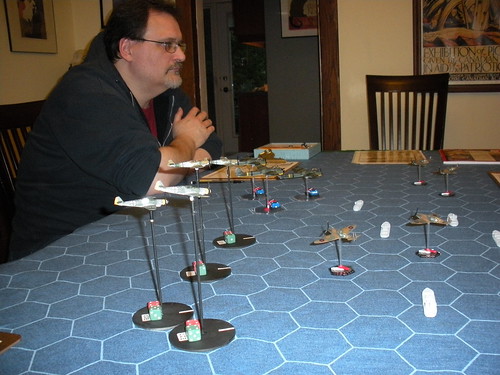
German commanders discuss the strategy for the counter attack.

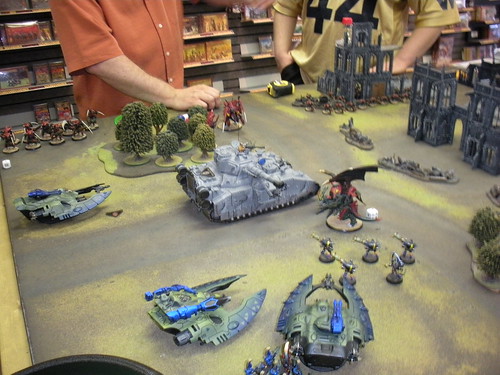
The scenario featured a West German Panzer Grenadier Brigade - two battalions of grenadies in Marder 1A3s, and a battalion of Leopard IIs - trying to knock out some second echelon Soviet motor rifle units - two battalions in BTR-70s, one battalion of T-72M1s, and an attached company of heavy 125mm anti tank guns.

The Russians also had the option of recalling unis from the spearhead, which had already moved off the western edge of the table, but doing so would bring the wrath of the Soviet Marshals, so the Russian commanders were undestandably reluctant to stop the music.

The main objective was posession of a two extra-large "town" sectors. Normally in Spearhead, the town sectors can hold not much more than a company. This was a relatively built up area, so the sectors could hold an entire battalion and more. Whoever held posession of the town sectors at the end of 12 turns would be the winner.


Who could possibly defeat people that spawned Kraftwerk?

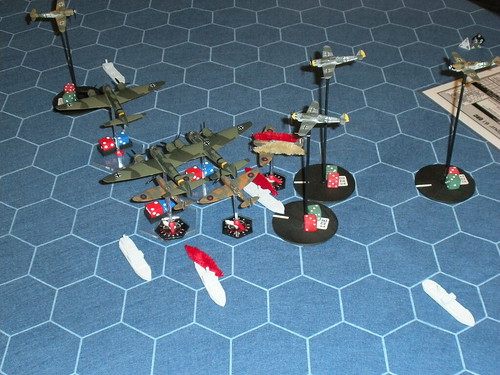
Bill and Chris opted for an ultra-defensive approach. One MR battalion was placed in each sector. The anti-tank guns were dug into a rail-yard on the outskirts of the town, and the T-72s took position in a farm field just past the 'burbs.

Dallas and Cam made a very straight-forward advance on the city. Chris made some ace rolls with the anti-tank guns. The decidely unglamorous weapons knocked out several platoons of Leopard II tanks, while Bill engaged the NATO armour with his T-72s very cautiously, losing some platoons to fire from the Leopards, but not enough to cause any morale problems, and knocking out some NATO tanks in exchange.

Dallas advanced two Panzer Grenadier battalions toward the city, and after losing some units to missiles and an enterprising platoon of T-72s which had moved ahead to engage from the flank (Marder 1A3 vs. 125mm AT gun...not pretty), flung his grenadiers in for some fun town-sector fighting against Chris' MR battalion.

The assault was....how does one say it? Ah yes - a perfect success. Poor Chris had some bad luck with the dice, and Dallas rolled Vegas levels, ensuring the brutal destruction of the motor rifles. In the next turn, Dallas piled his second battalion into the sector, while Bill counter-attacked with the second motor rifle battalion. This attacked caused some casaulties on the West Germans, but it was not enough. The Soviet battalion commander and regimental commander were both killed, and the second battalion routed.

Panzer Grenadiers celebrate at a de-briefing.

In the end, a perfect victory for the West Germans! Let the raves begin! After the game we speculated that perhaps that lead battalion of grenadiers was composed of the West German national kick-boxing/UFC/karate/hobby shooting/fun-with-missiles team. Thanks to everyone for coming out and to Dallas for hosting. I pestered Dallas to take some pictures (as usual) so hopefully he will post them to the blog when he has a moment.

Tuesday, June 23, 2009

Pimp my Hetzer

Well, it seemed like I started this project a few weeks ago, but actually, it was in April. So my painting momentum has certainly slowed through the spring - I'll have to work on that. Nevertheless, GünSchwarm has some fresh AT firepower to deal with those pesky FuturKommies in the form of a Space Hetzer.


The WW2 Hetzer was a compact vehicle, not too fun to crew, with a low profile and cramped fighting compartment. It mounted an effective AT gun though. Overall, a very efficient design. But GünSchwarm doesn't roll that way. The problem was solved by using a 1/35 scale Hetzer for the model, and providing the obligatory massive gun, along with a few other bits, crew hatch etc. The net effect seems to be some kind of "Jag-Hetzer".....


The long-barreled, extra-high velocity variant of the 120mm GünSchwarm AT Cannon/Community Improvement Tool would probably tip the vehicle over as soon as it tried to drive anywhere. So let's say for the sake of argument that the Gün engineers figured out some sort of advanced suspension that is powered by 100% recycled FuturKom POWs...


We all know the fate of newly painted models - still, I look forward to rolling this vehicle out when we resume our New New Future War....

Monday, June 22, 2009

The heat is on - time for some Cold War...

Now that balmy summer temperatures have arrived in Winnipeg, the Conscripts will cool off this week with some Modern Spearhead. The clock will be set to 1988, and our setting will change from the scenic splendour of the Fulda Gap, to northern West Germany, where the Soviet 2nd Guards Tank Army is blasting its way to the North Sea coast.

NATO doctrine calls for troops to trade space for time. The Bundeswehr don't quite agree, and a West German Panzer Division has decided to give the Russians a bloody nose. Be sure to join us on Wednesday night as the West Germans launch a sudden counter-attack. Will the Soviets be stopped? Driven back? Or chuckle at the attempted schnitzel speed bump as they roll on to the coast?

Saturday, June 13, 2009

"Check Your 6!" - Operation Pedestal : Can Malta be Saved?

Operation Pedestal was a British operation to get desperately needed supplies to the island of Malta in August 1942, during the Second World War.

Malta was the base from which surface ships, submarines and aircraft attacked Axis convoys carrying essential supplies to the Italian and German armies in North Africa. In 1941 and 1942, Malta was effectively under siege, blockaded by Axis air and naval forces. To sustain Malta, Britain had to get convoys through at all costs.

Operation Pedestal started on 9 August 1942, when a convoy of 14 merchant ships sailed through the Strait of Gibraltar, protected by two large forces of British naval vessels.

The game at Dallas' last Thursday night, June 11, recreated a portion of the action that occurred on the afternoon of August 13, 1942. All the model aircraft used were 1/144 scale.

Three JU88s were controlled by Kevin, a +2 aircrew leading two +1's:


Kevin's bomber flight was escorted by a flight of Bf109Fs flown by Greg. Each element had a +1 wingman, and was led, respectively, by a +3 ace and a +2 veteran.


In defense, a flight of 4 Spitfire Vs from Malta flew cover, a pair of planes each run by Brian and Dallas. Their pilots' skills were the same as the German fighter pilots, although the British ace had only 8 machine guns as armament, no cannon.


The object of the attack were five merchant ships (all scratchbuilt by Brian), controlled by the British players. The German bomber flight has penetrated the cordon of British naval escorts and is on its final attack run...


The trailing ship, the tanker SS Ohio, was reduced to half speed, having already been hit at 1050 hours that morning. The lead ship and the SS Ohio had light AA gun batteries. The SS Ohio was counted as having two batteries, representing resolute American volunteers from the recently sunk Santa Eliza manning the guns.

The flight of JU88 bombers started in the middle of the northern table edge. To the west Greg placed the escorting fighters. The RAF flight came in from the southwest and southeast table quarters. Below, the convoy steamed eastward. All action took place at Surface CAB low. No diving out of the fight!

The German bombers flew southeast toward the lead of the surviving merchant ships. Their fighter escort was a little behind and to the west. The RAF Spitfires all headed northwards in the general direction of the bombers.


The bombers descended slowly right to the deck, angling for the lead vessel. Anti-aircraft fire rose up from the lead and trail ships. The Spitfires tried a shot but failed to do anything. The Bf-109's scored a lucky hit on Brian's wingman.


The action soon hotted up. Mistaking one of their own protectors for the enemy, the gunners on the SS Ohio accidentally shot down Brian's wingman! The other German aircraft let loose several long bursts, scoring lucky hits on Brian's other Spitfire, setting it on fire. The long experience of the Luftwaffe bomber crews was evidenced by two bomb hits, cutting the speed of two stricken vessels in half.


The third bomber then took over the lead of the flight, banking west in a run against the SS Ohio. Greg's fighters tailed Brian's remaining plane as its pilot desperately tried to bring his Spitfire to bear on the bombers. One of Greg's fighters ran out of ammo. Brian's pilot failed his piloting check and crashed into the sea. Meanwhile, Dallas' ace let loose a long burst into a bomber, but his bullets failed to score any significant damage.


Sensing that he had a better chance of damaging the Luftwaffe fighters, the British ace Immelmanned around and shot up a surprised Bf-109, setting it on fire. The German fighter fired off a burst in return, failing to damage the RAF plane. The other two German fighters attacked a Spitfire whose sights were set on the last bomber; the Spitfire suffered frame damage from the German cannon shells. A burst of cannon and machinegun fire from the British fighter failed to hinder the Luftwaffe bombardier's aim. That worthy landed his stick of bombs right on the Ohio, leaving it dead in the water...

(click on the photo for a larger image)


The game was then called. The only way the German side could have been more successful was if they had managed to sink one of the ships, either by concentrating their attacks on a single vessel or by sending the fighters down on the deck to try and strafe. (Historically, fighters from Malta were fired upon by the convoy in confusion because communications between the convoy and the RAF were out. In the end, only 5 of the 14 ships made it into Malta's Grand Harbour. Last to dock was the wounded SS Ohio, which had to be towed in, but whose cargo of precious fuel kept Malta in the war.)

Thanks to Dallas, Brian, Greg, and Kevin for playing. It was a really fun game to run. In after-game discussion, we raised the possibility of adding another pair of defending Spitfires, and a pair of Stukas. In due course I shall write up the scenario in proper CY6! format, encompassing these various options.

Friday, June 12, 2009

"Hooray" on behalf of Modern Russians

I was very pleased to see this on TMP: http://theminiaturespage.com/news/824645/.

And not in 1/56th scale (i.e. the world's worst model scale). While the price is horrifically eye-watering, I will be looking forward to getting at least one of my Soviet motor rifle platoons into these.

And the SP mortar will be great for the Airborne guys!

Thursday, June 11, 2009

Astro-mini-con Game 3 - Sink The Baneblade!

The third and final game of the tournament was against Chris' balanced Tyranid force:

Winged Hive Tyrant w/ TL Devourers
9 x Warriors w/ 8 Deathspitters and 1 Venom Cannon
32 x Termagaunts
9 x Genestealers
9 x Genestealers
Zoanthrope w/ Warp Blast
Carnifex w/ T7, W5 and Scything Talons

The big bugs had their upgrades mounted with magnets, so they were very customizable. Cool!

Scenario:
It was a kill point game; whoever scored the most enemy units would win. The third party, a Baneblade super-heavy tank, was of the Apocalypse variety, and was worth 3 kps, one for each structure point. There were rules for how it would move and how each of its guns would target and shoot enemies, so it would attack either side. The Baneblade could score kps as well. Theoretically, the Baneblade could win the game!

The table was fairly open on the western half,where the Baneblade started. The eastern half of the table was basically a ruined city.

Both sides could only set up Troops on the table; everything else was in reserve. The Swordwind went second, so I declined to set up anything; the Spiders would deep strike, and everyone else was mounted up. The Termagaunts and Genestealers set up in the ruined city, mostly out of LOS of the Baneblade.

Not much happened early in the game, except for a Termagaunt dying to a shot from the Baneblade.

The Hive Tyrant and the Zoanthrope showed up - they could do some damage to the big tank. The Swordwind rolled hot on reserves, and everybody except the Autarch and one Dire Avengers squad showed up. The Prism and Brightlance armed Wave Serpent moved on to take pot shots. The Banshees' Serpent moved flat out to capstone the other vehicles,shielding them from Tyranid fire. With 12" move and 2" disembark, the Fire Dragons would be within the 6" Melta range of the supertank. The following photo shows the results of movement and deep striking, just before the Fire Dragons disembarked from the right-most transport.


Despite missing 3 times (curse those 1's and 2's!), the Dragons managed to pull off a Structure Point and kill the heavy bolters facing them. Fire from the rest of the army, including a focused shot from the Fire Prism, managed to slow it down and shut down some more guns, but only for a turn.

Score: Baneblade 0, Swordwind 1, Tyranids 0

The Baneblade's return fire was devastating for both the Dragons and their transport. This photo basically says it all:


We borrowed a crater from another part of the battlefield to illustrate the carnage. Note to self - bring extra craters for exploded vehicles.

At least the Dragons died doing what they loved to do, with their faces to the enemy. However, with 2 kp's to its credit the Baneblade was winning the game!

Score: Baneblade 2, Swordwind 1, Tyranids 0

The Genestealers started pushing their way into the ruined cityscape. If they could get to the Eldar deployment zone, they could score another battle point for the tournament. Nothing much else happened in the Tyranid turn.

The other Avenger squad showed up. Their transport moved in behind a wrecked building content to hunker down for awhile. The rest of the Swordwind poured on the fire, resulting in several stun results, a destroyed lascannon and another structure point. Not enough! The Tyranid general was within charge reach of the super-heavy.

Score: Baneblade 2, Swordwind 2, Tyranids 0

The Baneblade was unable to damage the Hive Tyrant, who proceeded to pull off its Demolisher Cannon and tear off the left side tread, immobilizing it. However, the Tyrant couldn't manage to strike deeper into the tank's structure.

The Tyranid warriors failed to show up again, no doubt engaging in serious dialogue about the galaxy-wide economic downturn.

The Farseer Doomed the Tyrant, anticipating that it would be the next big threat. The Banshee's Serpent moved slightly north, getting an angle on the Tyrant. Its fire put a wound on the big bug.

The Autarch had also finally showed up. His meltagun was within 6", so he let loose a blast of superheated plasma. That shot penetrated the already weakened armour, destroying the tank, taking its last kill point, and wiping out its score of 2.

Score: Swordwind 3, Tyranids 0

The Tyranid Warriors and the Carnifex finally showed up to the party. The Tyranids poured fire into the Howling Banshee transport, managing to immobilize it. The Hive Tyrant leaped over the hulk of the dead supertank, and blazed away at the Autarch, who was busy congratulating himself on his marksmanship. The Autarch died, his armour unable to hold up to the dozen wounds inflicted upon him.


Score: Swordwind 3, Tyranids 1

Now was the time for the Farseer to focus her psychic energy on the Tyrant, and unleash the full might of the Swordwind. She of course proceeded to screw up her psychic test, rolling an "11". Both Avenger squads dismounted. Everyone with LOS poured fire into the Tyrant, managing only another wound from a Bright Lance. The Warp Spiders used their second jump to move closer to the Tyrant. It would have to deal with them, otherwise their S6 guns might cause a lot of damage.


The Genestealer squads both made it within 12" of the Eldar table edge. The Zoanthrope tried a shot against the immobilized Banshee Serpent, but the psychic bug failed to penetrate the vehicle's energy field. The Warriors were too far away to charge, and their fire failed to do anything of note. The Banshees contemplated making tea. The Tyrant shot at then charged the Warp Spiders, wiping them out.

As the game wound down due to time, the Eldar forces buttoned up. The Farseer advanced to pick up the spirit stones of the fallen Autarch and Warp Spiders. Whatever units could fire did so, but the bug general's carapace was proof against their shots.

Chris was amazed. The ONLY model the Tyranids lost all game was that one Termagaunt. Meanwhile, the Eldar had lost about 25% of their entire force.

Final Score: Swordwind 3, Tyranids 2, a close but clear Eldar Victory!

Throughout the day, other scoring for the tournament went on. The judges scored army painting over the lunch hour break. The participants voted for the Best Single Miniature and Best Army. Each player scored their opponent's Sportsmanship each game. As games ended, the Sportsmanship and Battle scores were given to the judges, for them to assign opponent and table match ups in a Swiss style system.

The final results were posted here.

I was fortunate enough to win the Best Overall prize, and I won a free boxed set of Eldar Harlequins. Much thanks to Mark and the local GW store, Christian and Keith representing Astro, and to my opponents, who made for a great day of gaming.

Sunday, June 7, 2009

Warhammer World


Again as part of Euro Assault 2009, I was fortunate enough to be able to visit "Warhammer World" in Nottingham. WW is the worldwide public headquarters of Games Workshop and somewhat of a mecca for people like me who are long time Warhammer/Warhammer 40K/Lord of the Rings/Epic/Warmaster/Necromunda/Mordheim etc etc fans. As much as I love to hate GW for their asinine business practices I really wanted to go to Warhammer World. So here are some pictures and a brief report on WW itself.


The place itself was easy to find in a light industrial section of Nottingham and consists of several discrete areas. There is a spacious playing area with excellent terrain, Bugman's Bar and restaurant, the Citadel museum display upstairs, and of course an amply-stocked retail facility with Warhammer, 40K, and LotR stuff.


The quality of some of the terrain tables was amazing - you would recognize some of these from reports in the White Dwarf.
Loads of fantastic figures in the cases at the Citadel Museum.
Had to take some photos of the Studio Chaos Dwarf army from the '90s - "Big Hats" were my first Warhammer army!
Directions to the retail store are clearly marked... just as you'd expect ;-)
Highly recommended for Warhammer fans!

Saturday, June 6, 2009

Astro-mini-con Game 2 - Hammer and Ambull

The second game was an interesting exercise in timing and distance. The opposing forces were Fabio's Chaos Space Marines:

Winged Demon Prince, with Warp Time and Mark of Nurgle
7 x Death Guard, Meltagun, Champion w/ Power Fist, riding in a Rhino APC
5 x Emperor's Children w/ Blastmaster
2 x Obliterators
2 x Obliterators

Lots of redundancy and resilience.

Scenario: Victory Points game. It was a desert table with some ruins and low hills scattered about, and an obelisk in the middle of the table. The entire board was subject to Night Fighting for the ENTIRE game. Also, there were three Ambull models available; they're Monstrous Creatures dating from RT days. Every turn at the top of the turn, any Ambulls not in play (including those killed earlier) would appear 6D6 inches from the obelisk, in a random direction, as they burrowed up from underground. Any units in contact would be assaulted, otherwise they would move normally in subsequent turns. Killing Ambulls wouldn't even score an victory points - they were a spoiler for both sides. Fortunately, their presence didn't alter the outcome of the game.

This was an interesting tactical problem. Night Fighting really limited both side's long range firepower. The vehicle-mounted Death Guard would be very good up close, and had a ~27" threat radius (disembark plus 12" move plus 12" rapid fire and melta range). The Swordwind would also be very good at such close engagement ranges, but the Death Guard would be a tough nut to crack if they worked together.

The Swordwind won the roll so went second. The Chaos forces set up the three Death Guard squads in their Rhinos in a small phalanx, in the northeast table quarter. The two Demon Princes set up behind them. The Obliterators and Emperor's Children were held in reserve, with the Oblits deep striking.

The Swordwind held everything in reserve; everything that could be mounted would do so, and nothing would deep strike. My plan was to try and separate the Rhinos from each other with hit and run tactics.

A couple of Ambulls appeared, in the northeast and southwest table quarters. No combat yet.

The Chaos phalanx moved in a southeast direction, skirting the central area. By their second turn, they were about three feet into the southeast table quarter. They were in a line astern formation, with the Demon Princes hidden behind the bulk of the vehicles.

Most of the Eldar Forces arrived second turn, except for the two HQ's. Typical. The Warp Spiders and Fire Prism came on, respectively, about one foot and two feet from the nearest Rhino. Everything else skimmed into the southwest table quarter.

The Eldar made some good spotting rolls. This allowed the Warp Spiders to see, shoot and immobilize the first Rhino. The Prism landed a focused shot on the lead Rhino, disarming it and wounding a Demon Prince standing next to it. The Spiders then jumped 9" back towards the Prism. The rest of the Eldar vehicles shot at and killed the Ambull in that table quarter.

The Chaos guys then got attacked by an Ambull, but it was no match for the swordsmanship of the Demon Princes:


The two mobile Rhinos and the two Demon Princes moved west, trying to catch up to the swift Eldar. Disembarking, a meltagun nailed a Spider. The two Eldar characters showed up. They and most of the forces moved north. The Warp Spiders struck the closest Rhino again, immobilizing it. The Fire Prism moved about a foot west and again landed a focused blast on the same Rhino and the wounded Demon Prince. The Rhino lost its gun. The Demon Prince was wounded again. The Warp Spiders' second jump was only four inches.

The two Obliterator squads and the Emperor's Children finally showed up. Trying to teleport behind the Fire Dragons' Wave Serpent, one Oblit squad deviated and landed in the northwest table quarter. The other one deviated right onto the same Serpent. Oops. As a result of a roll on the Deep Strike mishap table, I placed that squad in the very northeast table corner, effectively putting them out of the game. The Children walked onto the table in the northwest quarter.


The first Obliterator squad managed to shoot down the Banshee's Serpent, forcing them to disembark. The wounded Demon Prince managed to catch and assault the Spiders, wiping them out.

The Fire Dragons disembarked and shot at the nearby Obliterators, killing one. The Banshees then charged and wiped them out. One Avenger squad dismounted. Their assault weapons' Bladestorm killed the already wounded Demon Prince. The Fire Prism killed a couple of Death Guard.

An Ambull charged the Fire Dragons. Through sheer desperation, they managed to fend off its blows, suffering no wounds.

The last Rhino and the surviving Demon Prince moved away from the action, seeking the shelter of a small hill and the support of the other Death Guard squads.


The Blastmaster missed the disembarked Dire Avengers.

As the game wound down, the Eldar Avengers mounted up and moved with the other vehicles north and west. One Serpent and the Autarch moved to protect the dismounted infantry from an Ambull that was getting a little close. The Fire Prism lost sight of the Death Guard in the darkness. The rest of the Eldar vehicles laid fire on the Emperor's Children, who went to ground, killing only a couple. The Banshees came to the aid of the Fire Dragons, the Banshee Exarch killing the Ambull before it could swing again.


The Chaos forces had killed the Warp Spiders and had destroyed one Wave Serpent, for a total of 210 victory points. The Eldar had damaged two Rhinos, killed one Obliterator squad, and killed one Demon Prince, scoring 351 victory points. With only a 141 vp advantage to the Eldar, it was tie!

Though not a decisive engagement, the Eldar battle plan had basically worked. They had shut down the Chaos ability to concentrate their forces by denying them their mobility. If the game had continued, the Swordwind would have concentrated on the Emperor's Children then withdrew to the northwest corner, to try and seal a clear win.

Result: Draw

Please click here for the third and final game's batrep .


Friday, June 5, 2009

Army tray

Because some people have asked, here's the army tray image. Kev cleaned it up, and I took it to a printer's to get made into a poster. Click on the pic for a larger view (no copyright is asserted).

Thursday, June 4, 2009

Partizan 09


This spring, as part of "Euro Assault 2009", I was fortunate to be able to attend Partizan in Newark. This was my first wargames show (after wargaming for something like 20 years) and I enjoyed it immensely. Here are some photos from the show, along with my recollections of the games. Remember to click the pictures for larger versions.


Mark Bedford and Warwick Kinrade's Crusades game. Muslims storming the breach


Wider view of Mark and Warwick's game


Detail of a fantastic "1066" display game


Look at the size of those shieldwalls!!


Great War on the eastern front with loads of cavalry

Seven Years' War action

More of the 1066 game


15mm WWII game on Kallistra hex terrain


Too Fat Lardies' Great War participation game


Great terrain from the Lardies


Westwind Shadows of the Third Reich arctic game


Love the LEDs in the U-boat hull!


Victrix's amazing Peninsular War display game


Great trompe l'oueil backdrop too


Crimean War game with redoubts a-plenty


Lovely Napoleonic Brits...


...awaiting deployment in the Perrys' game


Perry Napoleonics


Alan P. and the lovely display game


Wagram in 6mm


6mm Wagram game


"Britsh Civil War" game as the sun rises ;-)


More 1066 Shieldwalls


Look at all those models!


Spanish Civil War in 28mm
Partizan was fantastic. The quality of the display games was nothing short of excellent in almost every case. There were tons of vendors and it was very cool to meet some of the hobby's "celebrities" in person. This kind of thing might seem a bit silly to hobbyists in the UK who have a choice of shows on almost every weekend, but to a long-time painter and war-gamer like me who'd never attended a big show before, it was pretty special. Highly recommended and I hope to do it again in future!