Showing posts with label Austrians. Show all posts

Wednesday, November 13, 2024

12mm WW1 Austro-Hungarian Infantry

Ausro-Hungarian infantry charge into action - what could go wrong? 12mm metal figures from Kallistra.

Continuing along with my slow-moving (but still moving!) early WW1 eastern front efforts, we have a collection of 12mm Austro-Hungarian infantry. These are figures from Kallistra's delightfully complete early WW1 collection. 

An officer can be seen among this group. The collar tabs had different colours, depending on the regiment, and I tried to pick them out, just to add a splash of anachronistic color.

I enjoy painting Austrians in SO many other historical periods, so why not WW1? It also just adds to my general fascination with the setting - beyond the general awareness that the Austro-Hungarian army did not perform very well, I didn't really know any details as to why...so as I start to dig into this setting, I'm also enjoying the readying and learning that come along with it. 

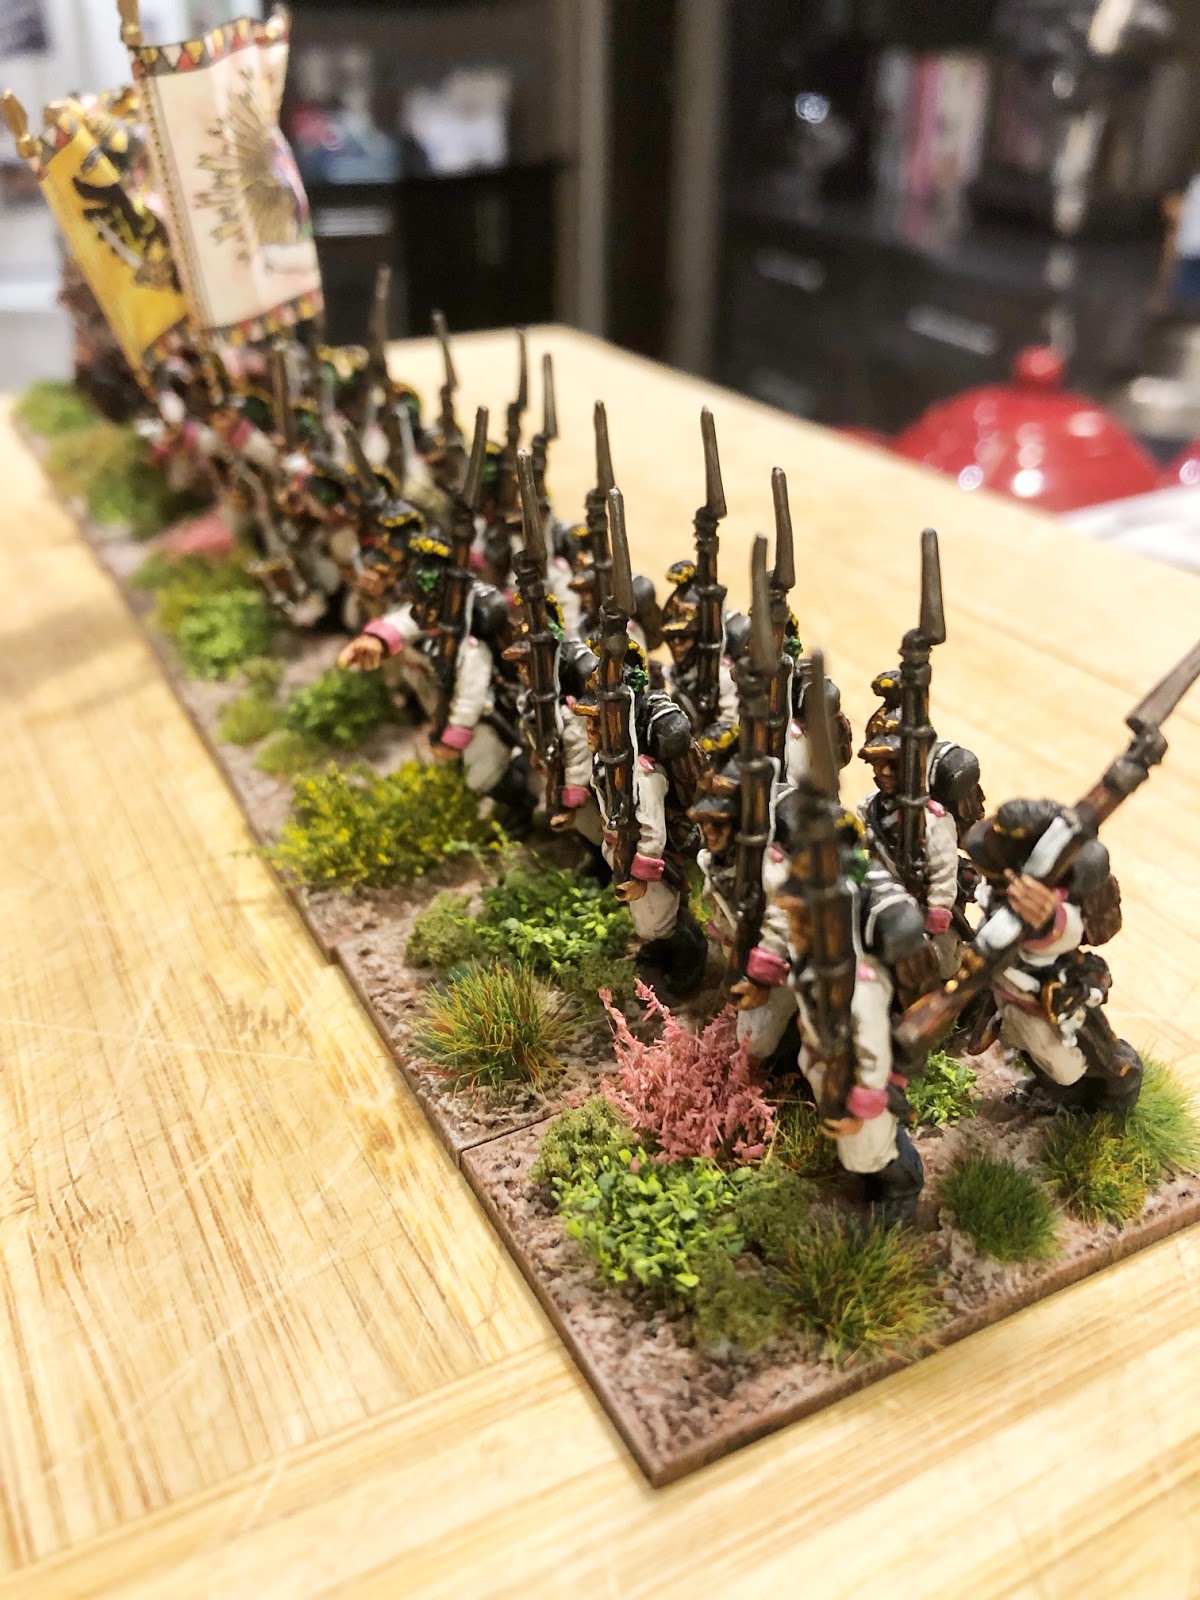
View showing some of the kit on the rear of the figures.

Now, one thing that Dallas does really well on his blog posts, and that I need to follow more of, is using the post to share (and therefore have a record!) of paints used to come up with particular colours. That way, when you take a break from a project, you can return to it again and maintain some consistency in the look of the figures. The Austro-Hungarian infantry uniforms will be the first to get this treatment!

Another view of the advancing infantry...

When it comes to the uniforms worm at the opening of hostilities in 1914 by the Austro-Hungarian infantry, I was a little stumped. I mean, they are plain looking enough - the color flourishes involved for the individual regiments are pretty small, and not easily marked out on 12mm figures. They are clad in grey. Is grey hard? Sometimes, yes! At least for me. I found the grey to actually be kinda tricky.  The uniforms are described as "Pike Grey" in different sources. It is grey for sure...but also kinda blue?

Another photo of the kit on the troops.

To try and achieve this grey-that-looks-blue-but-also-blue-that-looks-grey outcome on the figures, I experimented a fair bit, before I landed on the following approach: using GW paints, I went with the following sequence - started with "Dark Reaper" as the base coat, then "Thunderhawk Blue", with final highlights of "Russ Grey". This was followed by a coat of "Gryph Charger Grey" from GW's "Contrast" paint range.

MG crew...I didn't quite line up the belt on the gun here...these fellows will have a tough time getting this into action! Seems right for the Austro-Hungarians, based on their reputation...

Because the figures are smaller, I try to over-punch the final highlight, so there is rather more "Russ Grey" involved on these smaller figures than you might try on a larger one. If there are larger ones? I believe Peter Pig has these fellows in 15mm, but I don't know if there are any 28mm Austro Hungarians out there?? 

Another view of the MG crew...were these guns yellow during the early WW1 period? I have seen some references indicating yes...but I don't have confidence in that conclusion, and have to confess that I am just going by the seat of my pants here...

As with my other 12mm WW1 figures, these are based for use with the "1914" rules from Great Escape Games. The collection of four bases would be sufficient to represent a battalion of infantry, with each base representing a company of infantry. 

We have Schwarlose (sp?) MG crews ready to support the infantry. I have seen some references to these MGs (and the Austro-Hungarian artillery, for that matter) painted in yellow...as a Hapsburg throwback? I don't actually know what colour the weapons were painted...but I went with the yellow for now. 

It's great to have some Austro-Hungarian infantry out the door. And while these troops did not have much in the way of archaic flair, the cavalry of the Empire in 1914 did not disappoint...watch this space for more on that soon!

That's all for now - thanks for reading, and stay tuned for further development on this project through the fall and into the winter!

Monday, March 11, 2019

Painting Challenge Submission 14 - Austrian IR 38 in 28mm

The troops of Austrian Regiment IR 38 practice drill on the marchfeld in my kitchen...figures are 28mm.
The end of the current edition of Curt's Analogue Hobbies Painting Challenge is nearing - fortunately my points target is in sight too! I figured I would march straight across that goal line in style, with a big unit of 28mm Austrian Napoleonic infantry. These figures are all from Sash & Saber with the exception of the mounted officer, which is a Wargames Foundry casting.  The flags are from "Flag Dude".

A view down the line...
The Napoleonic setting is a gaming era which has not seen any attention from my paint brushes for a number of years now.  I last painted a few individually-based 28mm Austrian infantry officers for an incredible game of "Sharpe Practice" hosted by Curt back in 2016.  I can't remember the last time I added an actual unit to my Austrian forces. But when I found those SYW Grenzers that I had painted a couple weeks ago, I also spotted these fellows sitting in my unpainted-pile-of-shame.  They were all racked up, just waiting for a base coat before I got going on them...they have been sitting in that state since around 2012, I think.

All foot castings are from Sash & Saber, while the mounted officer is from Wargames Foundry.
A variety of different things motivated me to dig these guys out and get them painted. The theme of this edition of the Painting Challenge, "Fellowship" had me reflecting on friendships and connections I have made over years. In fact, my Austrian Napoleonic collection is closely tied my friendship with Curt - when we first met (about 20 years ago) I was curious about Napoleonics, and he encouraged me to paint Austrians in the first place. I have fallen in love with gaming Austrians ever since.  My collection started out in 15mm back in 1999. Since then I have painted some in 6mm, and some more in 3mm. Of course I ultimately tipped into 28mm. Nine years ago, Curt inspired me to do up these 28mm units in a sort of "Grand Manner" style, and I started painting them in the summer of 2010 - the same summer I got married! In fact, Curt's wedding gift was magnificent command base featuring Archduke Charles himself :)

Love the different NCOs you get with Sash & Saber.

While it has been many years since Curt moved from Winnipeg, anytime I walk past my figure collection, I always see the 28mm Austrians, and I always think of Curt and Sarah, and wonder how they are doing.  And while of course anyone who has even casually followed either of our painting tracks will see that Curt and I wander all over the bloody place in terms of scales, periods, settings and projects, there is always something extra fun for us a Napoleonics game is taking place...and there have been a number of magnificent games over the years, too many to recount here.

These sculpts have great character - and good variations to break up the marching poses.
Anyway, when I spotted the Austrian figures in the pile, and I knew that Curt was coming to visit too - I thought it was all a sign from the hobby gods.  There was no way I could let an edition of the Painting Challenge based on "Fellowship" pass by an not add another unit to my 28mm Austrian collection, particularly one which had been waiting years for attention!  So here is IR 39 Herzog Ferdinand von Wuttermberg.

Another shot of the command figures...you can also spot the sapper, marching along with his comrades.
Of course, the Austrian units have to be larger, because they had bigger battalions, right? Hence the 40-figure size for the main Austrian battalions, to take on the 32-figure units in Curt's French collection (and Byron's, as he has started adding a unit here and there for the French as well). The models have 15mm of frontage, and so are packed in quite close.  The bases are 50mm deep, to allow for a little extra protection, and some depth for mounted officers to mix in with the foot-sloggers.

One more group photo...
I painted IR 38 for two reasons - first of all, they have pink facings, which is neat. There are few units in the horse & musket era which had pink facings, and I had always wanted to paint one up.  Second, the soldiers of this unit were raised from Wallonia, which is in modern-day Belgium (I think).  Back in the early 19th century this region was still a Hapsburg dominion, and so provided soldiers to the Holy Roman Emperor.  I believe the Austrians lost this territory following their defeat in 1809...but it is still a kind of interesting acknowledgement of the great diversity of soldiers that made up the Austrian army in the era.

My Austrian brigades wait for a call to action to resit the Corsican upstart...
In terms of points, this submission allowed me to decisively stomp across my points target for this edition of the Challenge! It was great to paint some Napoleonics again.  In particular, it was fun to paint quite a few of these fellows while Curt was visiting! Staying up until all hours painting and chatting was great fun. 

I look forward to seeing them in action on the table some day soon - hopefully in another great Napoleonic game with Curt.  Cheers! 

Thursday, February 28, 2019

Painting Challenge Submission 13 - 28mm Austrian Grenzers for the SYW

"This way, lads!" Austrian Grenzers for the Seven Years War - 28mm figures from Front Rank.
And now something...well, not completely different, but just...a bit different, a slight adjustment to the control dials of historical periods.  These are Austrian Grenzers from the Seven Years War. The castings are 28mm metal figures from Front Rank.

Lovely reds and greens...the Christmas skirmishers!
The Seven Years War is another one of those long-simmering-but-never-boiling gaming interests of mine.  I do love gaming the Austrian side in just about any conflict, and my real heart-and-soul Austrian interests have been found in the Napoleonic wars. I have a small-but-healthy collection of Napoleonic Austrians, and have played some wonderful games with Curt and the crew over the years.  Curt was the one who pointed me in the direction of the Austrians when I we first got to know each other and I was just getting interested in Napoleonic gaming.  Of course I was hooked, and this has just increased over time. I love Austrians!

Love the animation of that officer...he looks ready to jump right into action...
Ah, the lovely long hair, tied with a black ribbon...
Following this into the Seven Years War seems(ed) like a natural step. The Austrians were a major participant in the wars, still wore cool white uniforms and had very cool-looking units. But I haven't yet dived in...I have done all of the preliminary things that help one get set up for a new period - like amassing a considerable amount of supporting info on the uniforms etc.  But I haven't yet tackled the painting part of it...in fact, my Austrian Seven Years War collection in 28mm so far amounts to a single unit! Well...you have to start somewhere, right?

Another view showing the kit, canteen, blanket roll and sword.
Anyway, I found these Grenzers while rummaging around in my pile of shame last week.  Inhabitants of the "grenz" - the border areas between the Austrian and Ottoman Empires - the Grenzers were fierce fighters and fine light infantry/skirmish troops, a nice dash of violent flexibility for a military establishment which was otherwise quite hidebound.

These poor figures have been sitting in there, primed, since 2013. That's six years ago! Yikes! I saw them and I thought it would be fun to just knock them off.  After all, the Grenzers wore some pretty fun colours in the Seven Years War period. Why not crack open the paints and enjoy! I flipped through some handy Osprey colour references, and came across the Carlstadt Liccaner Grenz. Red! Cool! Off we went! 

Ready for some skirmishing...
The figures are from Front Rank. I have not painted a lot of Front Rank figures, but wow, I really like them.  They are hefty, "well-fed" and have a certain character to the sculpting and posing that I just love.  And they are so fun to paint!  These guys were a treat.

These are based individually so as to represent a skirmishing formation for rules such as "Black Powder".  Grenzers always seem to be skirmishing, so I thought this approach most appropriate.

This is now, technically speaking, a second unit for my Austrian Seven Years War collection...hey - progress is progress...right?

Monday, November 13, 2017

The Battle of Teugen-Hausen in 6mm using Fast Play Grande Armee rules

With our normal host Dallas busy with work last week, Greg and I decided that it was time to further amortize my 6mm Napoleonic forces with another game.   Since it has been a while since the last game, we decided a small battle would be appropriate so we were not struggling with the rules too much in a large game.

Greg being the history buff pulled a gem out of his hat with with The Battle of Teugen-Hausen.  The battle was between the Austrians and French in April of 1809 and focused on some historical issues that were common throughout the period:  French aggressiveness bordering on over confidence and Austria's poor leadership and indecisiveness.  Both played out well in this battle.

We used the Fast Play Grande Armee rules, which have several very flavorful features that played out in this game.  To recreate the leaders involved in the battle we assigned 1 command die to the Austrians and 2 to the French.  Davout was a +2 leader, and his officers were +1, while Hohenzollern was +1 and his officers were 0's.


A brief historical overview:  In mid-April Davout moved his corps southeast, attempting to link up with his Bavarian allies. Dense woods and rugged terrain limited the scouting, so it was with some surprise that French and Austrian units made contact on April 19. An Austrian corps under Prince Friedrich of Hohenzollern stumbled upon Davout, and the Austrian commander sent word to Archduke Charles that he had found the French. Hohenzollern requested the support of the IV Corps, as well as the archduke's grenadier reserve corps.    

The French started with Davout and Saint-Hilaire's Division on the table near Teugen.  Mean while the Austrians started with Hohenzollern cozy and settled in Hausen with Vukassovich's division forward in the woods.  To win the French needed to either break the Austrians or get troops over the stream into Hausen or off the table via point E.  The Austrians had to either break the French or hold them achieving their objectives.  The game would last 6 turns.


The French started by moving forward in their first pulse of turn 1 (FPGA plays out over turns and pulses, each turn being between 1 and 4 pulses) towards the woods.  The Austrians played cagey and pulled back in the woods.  This continued for the entire first turn as the Austrians were not keen on fighting it out alone.


Turn two saw more action start to get underway as both the French and the Austrians got re-reinforcements to join the battle.


The Austrians had two divisions show up to help.  On the first pulse of turn 2, St. Julien's division moved up into the town to cross the stream and join the battle forming in the woods, which Lusignan's division went left of the town to stop the French from reaching point E (one of the French's victory conditions).  The French moved Friant's division up from point B towards the woods to help break through.

Here is where things went badly for the Austrians, but fittingly so historically.  St. Julien once in the town, refused to leave!  FPGA works with a friction system using dice to determine what you can actually do with each division.  Ideally you want between 7+10 on two dice and you can do whatever you want, good commanders give you a +1 to help get into that range, and good Army leaders give you bonus dice to use so that you can roll up to 2 additional dice and pick any 2 of the 4 you want to get the numbers you need.  However, the Austrians lacked extra dice to assign and had to roll 2 dice only for 4 pulses over 2 turns, and had St. Juliens division sit in the town taking violin lessons or something, then retreat for some unknown reason (maybe to avoid paying a bar tab?) before finally moving through the town a full 2 turns later!

Meanwhile in the center of the table, the French force advanced into the Austrian line and combat started. 

Over the next several pulses and turns, the combat raged back and forth in the woods.  Units made contact, shots were fired, attackers were forced back.  However, nothing really significant took place.  There were very few casualties as combat in the woods required 6's to hit, and neither side could roll more than 1 in a combat.  The French got an additional division of reinforcements on turn 3 that came in from point C and started making moves straight across the table to point E.


Turn 4 arrived, and the Austrians had finally setup a solid defensive line and were prepared to attack.  They also were begging the Duke for his grenadier reserves to hold the line and push back the French, but he remained indecisive about committing his finest men.


The Austrians launched an attack, or tried to...  Once again their poor command structure let them down on one flank where they attacked and pushed back the French in pulse 1, then suddenly decided to retreat!  In the center they decided to hold instead of pushing forward when they had an advantage.  The minor fighting continued though as the French launched an assault, only to be pushed back once again.


The time spent delaying on the Austrian side favoured the French, as their command structure was not so indecisive and instead of being concerned that things might not be perfect, pushed forward aggressively.  Friant's division moved straight past the conflict in the woods in an attempt to flank the Austrian force and push through to the town. Turn 5 once again saw the Archduke refuse to release the Austrian Grenadiers which were sorely needed at this point.


After so may combats in the game were only 1 point of damage would be caused, the French hammered into the Austrians and caused a stunning 5 points in one go, annihilating a stand in one combat.  This also set them up to cross the stream and win the game.


The Austrians had one last go at the French, trying to push them back with a lone cavalry charge, since YET AGAIN the Archduke refused to acknowledge that his Grenadiers were actually required.  The attack had no hope of success and was only done so that St. Julien would not have to face the music from the Archduke for having lost the battle (or pay that bar tab from earlier).

The outcome while demoralizing to the Austrians was historically accurate.  The poor leadership on the Austrian side had cost them what could have been an easy victory several times throughout the battle.  The French had very few command failures and pushed through to their objectives.  The French did loose a few units while pushing through the woods, but not enough to cause serious concerns.  There were more times than described in the battle report that the Austrians had something lined up, then failed to act on it due to poor command rolls.  They would either fail entirely and have to hold, or worse fall back for no bloody reason at all, right after inflicting wounds on French units! 

Overall the game was really enjoyed by everyone and once again proved that we really need to play more Napoleonic games as no matter the outcome they are always fun.

Monday, June 16, 2014

Black Powder Bavarian Brouhaha

Clouds of disciplined Hapsburg musketry fill the air!

Fresh off a great outing to Prairiecon XXXV (see here and here for some photos), the Conscripts stopped by last Thursday for a game we have not played in quite some time - Black Powder.  Dallas and I cracked out the 15mm Napoleonics for the game.  The scenario was set in the early stages of my favourite Napoleonic campaign - 1809 and the War of the Fifth Coalition.

Pre-game table - the French would start on the left side, the Austrians on the right

The 1809 campaign was a big show, with fighting in Italy and Poland as well as central Europe. It culminated in the noted engagements of Aspern-Essling and Wagram.  Vienna was occupied and Austria defeated. What a busy summer! But it kicked off with an invasion of Bavaria by Austria in April, and for an ever-so-brief period, Archduke Charles had the initiative as the French struggled to assemble properly from their winter encampments strung out along the Danube. Delayed by bad weather and by, let's say, an ingrained Austrian command culture, this wouldn't last, but there was some sharp fighting early on that might have tilted things in the Hapsburgs' favour.

Austrians advance
French brigade advancing

Davout's III Corps, encamped in various locations around Regensburg, was the most vulnerable French formation, and the conservative Austrian commanders did their best to impersonate the decisive movement of the French (Charles had even reformed the Hapsburg army into Corps-level formations instead of columns) in order to pin him and take him out.  But Davout was nobody's fool, arguably of Napoleon's best commanders.  His dispersed units repelled the various Austrian thrusts and escaped to the west, where Napoleon was massing the army and would soon turn the tide and sh*t can the Austrians back towards their own capital and beyond.

Initial encounter - Austrian advance screen against small French brigade...

Ouch - these were the kind of command rolls the French had all night
Hussars crash into the French - why didn't they form square? See above...

The scenario we played was a "what if?" set in this time, an alternate Battle of Teugen-Hausen.  In the real battle, St. Hilaire's division, screening Davout's western movement, fought a sharp and confused encounter with the lead elements of Austrian Field Marshal Vukassovich's Corps.  The fighting took place along forested ridge lines between the villages of Teugen and Hausen.  I used this engagement as inspiration for the scenario.

These Austrian light troops punched well above their weight in the game


Bill and Dallas played the French side.  They had a small brigade of two battalions and a large one of five battalions, and reinforcements in the form of two regiments of Chasseurs. Historically I don't think there was any cavalry present for the French, but where is the fun in that?  We imagined that perhaps units from General Montbrun's cavalry division were nearby. Leadership values reflected the elite and motivated French commanders.

Firefight in the valley - it goes ill for the French...


Frederick and Byron took charge of the Austrians.  The Austrian force had two brigades - one small one with a battalion of Grenzer, a battalion of Landwehr and regiment of Hussars.  The second brigade had six big fat Austrian line battalions - two full regiments of fierce sausage consumption.  Set against this force were relatively low command values and a special rules limiting the success of even a generous command roll.


You can see here the French (on the left) have struggled to set up their line of defence

The goals for each side was to capture the other's village, or failing that, not to lose their own. Fighting would proceed until one side or the other broke. I expected the smaller French force would have a better time maneuvering, while the sluggish Austrian commanders would struggle to get their big units into place. But the dice don't give a hoot about scenario rules, or my expectations, and they did not this night!

A view of the Austrian advance through the valley

Suffice to say the French had some bad luck.  And by "some", I mean "a lot".  While they didn't fail every command roll, they failed a lot of them.  The Austrian players had lots of hot rolling, even with the re-rolling designed to limit their hot rolling!  This carried into the shooting as well - the French musketry was indifferent, while the Austrians blazed away like they had depleted uranium musket rounds or something.

Austrians make a steady advance - see that unit in the back? That is the very first Napoleonic unit I ever painted...more than 14 years ago!

Early on the French were on the receiving end of a charge by the Austrian Hussars - the target French battalion failed to form a square, and got chewed up badly.  Overall, the leading light elements of the Austrians managed to out-gun and out-fight the leading French elements, while the French struggled to move into position.

French Chasseurs arrive and...well, don't get up to very much...

The Austrians, for their part, moved efficiently up the valley and into a nice, double-ranked advance that would make any linear-theory army commander pleased. From there, it was a matter of blowing the French away with some well-ordered musket fire.

Austrians form square as French cavalry approach...
The last chance the French had to turn things back was to get their cavalry involved - they arrived by the sixth turn. But again, command rolls failed at key moments.  It was not to be for the French. Their brigade broke, and General St. Hilaire would have some explaining to do when he next reported to Marshal Davout!!

The 2nd/57th tries to hold the line...

Black Powder is a wonderful set of rules - very quick to play, and very flexible in terms of setting things up.  One adjustment we made for this game was to goose up the shooting values and lower the "close combat" values for the units, with an eye to encouraging the players to hammer away with muskets and hold the bayonets until they have a solid chance to finish the opponents off.

I also love the very specific command mechanics within the spirit of the Black Powder rules.  You don't just roll the dice - you have to specify what you want first. This isn't the easiest change for casual players, but the guys totally embraced this during the game, leading to excellent discussions about what was intended before any dice were thrown, and a more interesting feel to the game - even better than Shako, in my opinion, even though with Shako you have to draw out orders.

Between the "new" edition of the 40k rules and all of the Horus Heresy projects, it may be a little while before we see some Black Powder in this space again.  But a big thanks to Dallas for bringing a bunch of stuff out, and to Bill, Frederick, Byron and Jim for coming out to play.