<This post describes a submission to the Analogue Hobbies Painting Challenge, but there is some added content especially for this blog's readers>
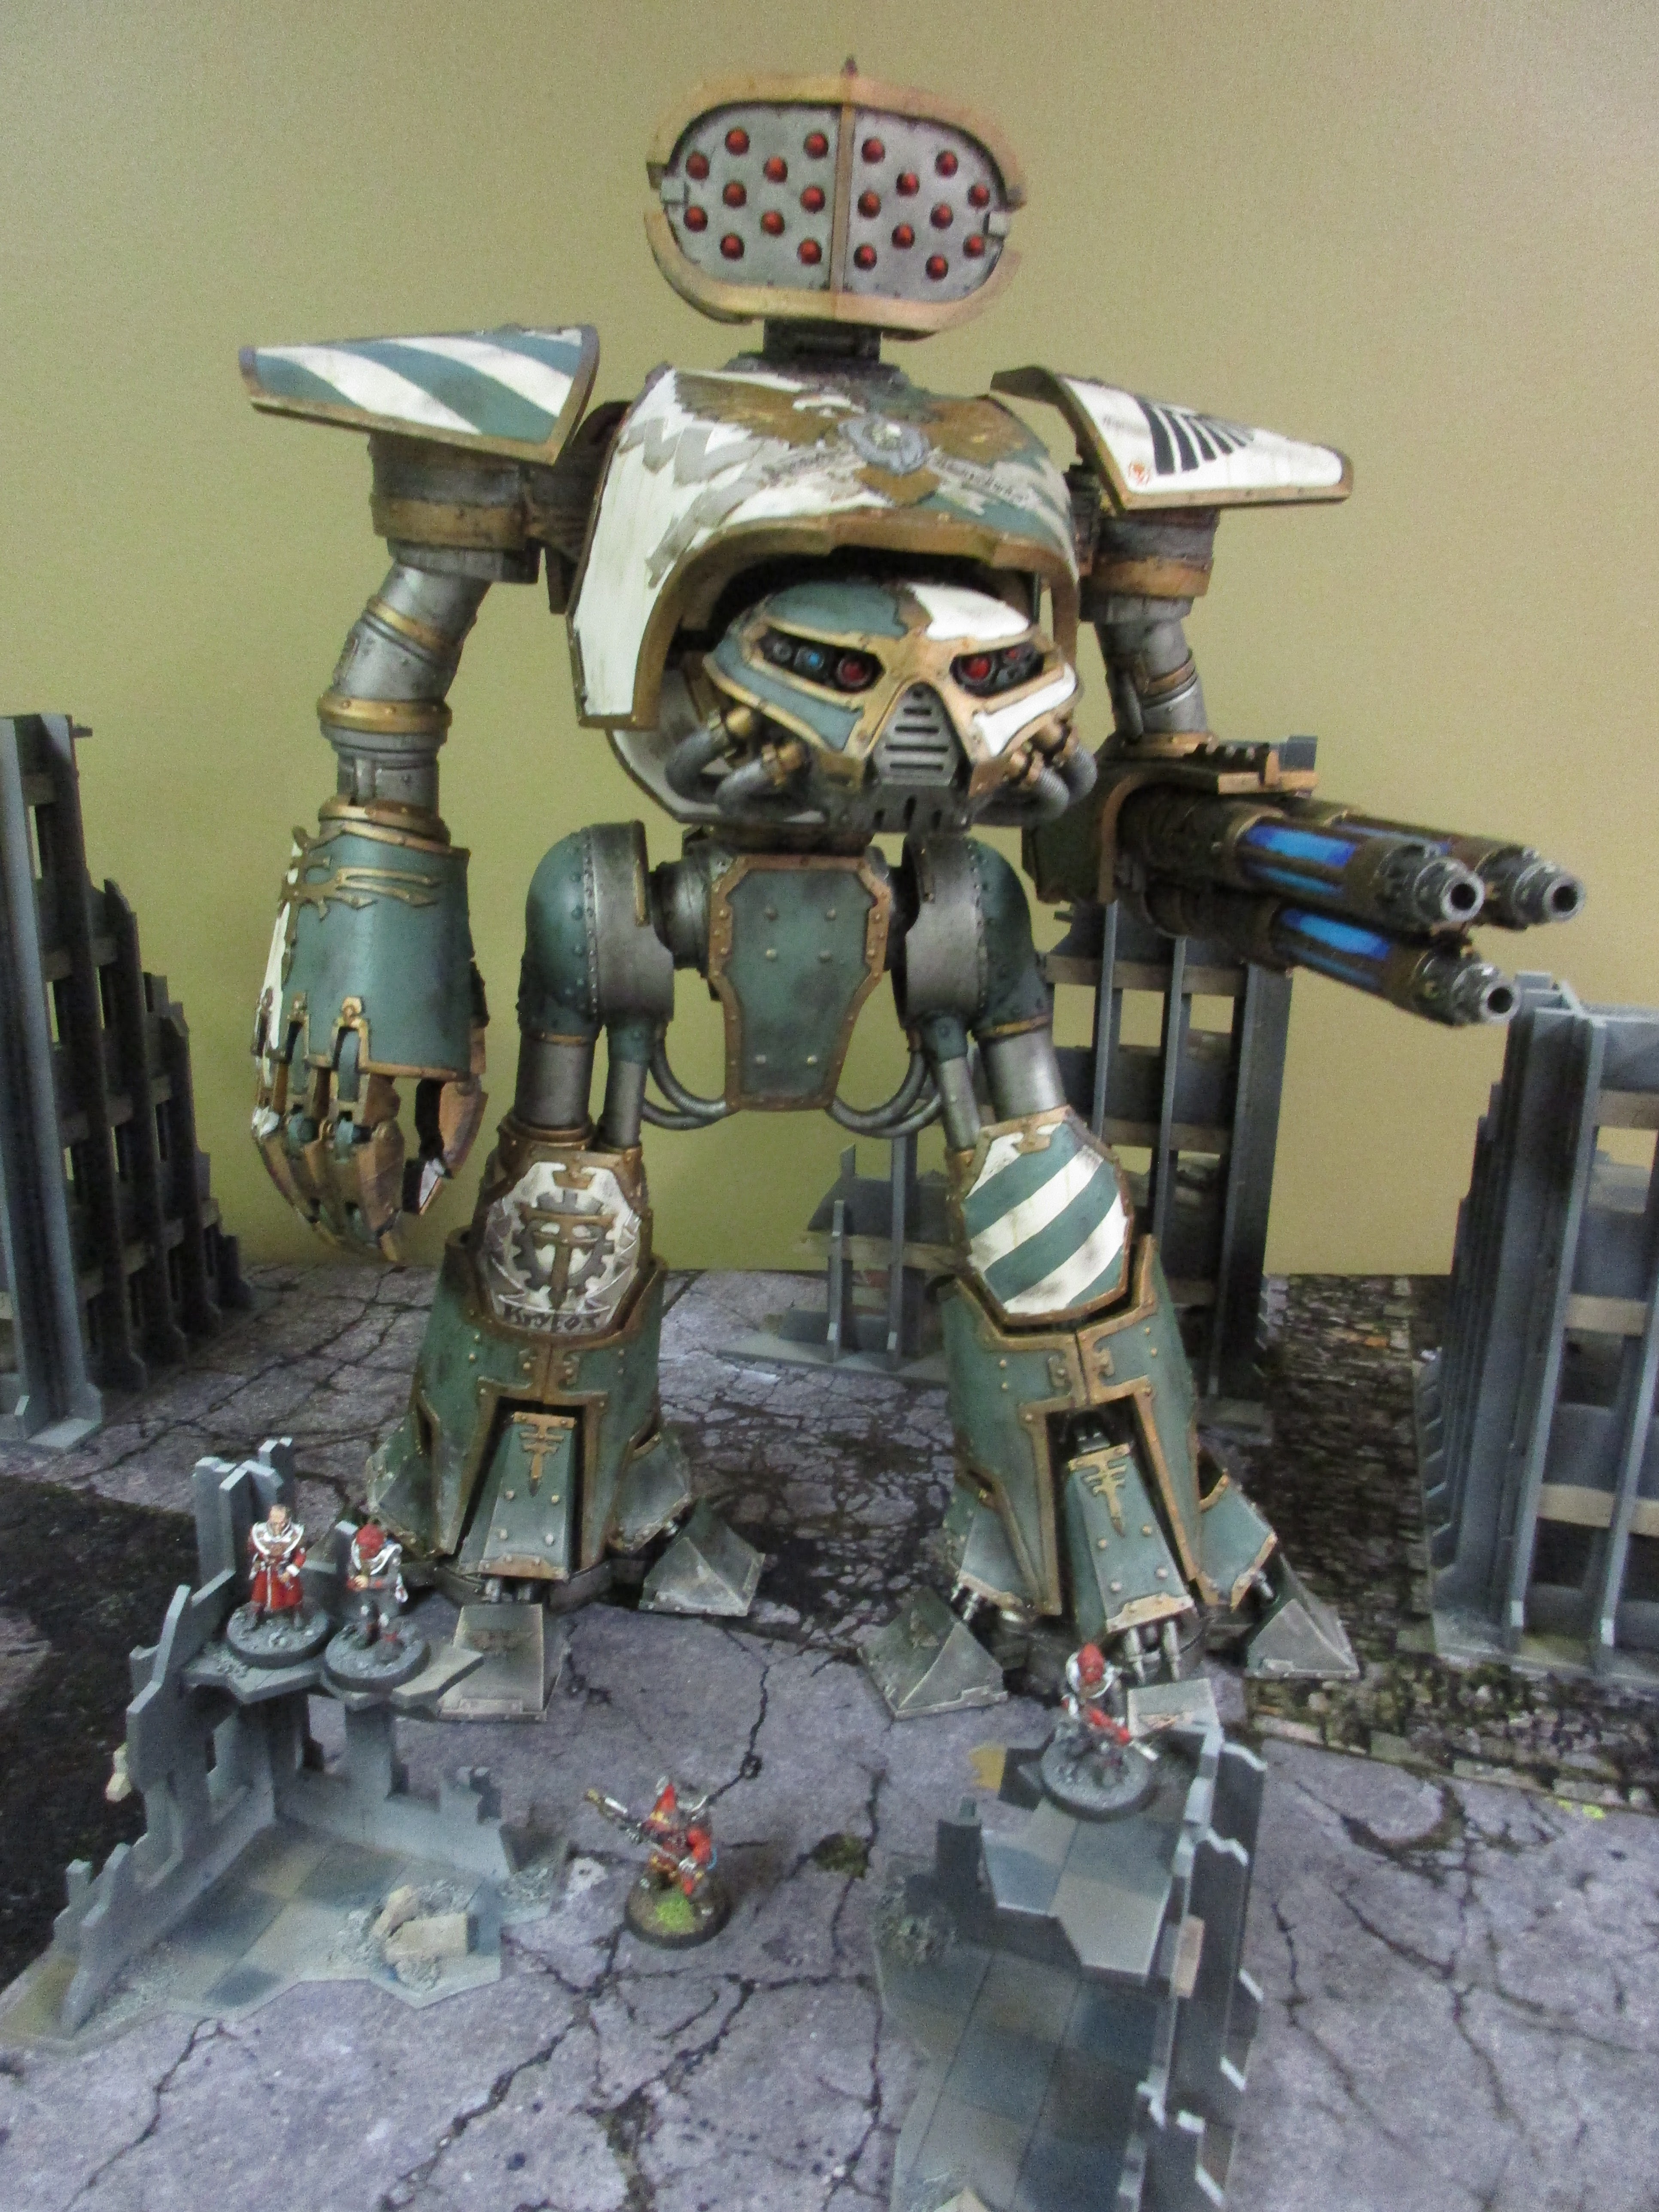
Here it is - a 3D-printed 40K-scale Reaver Battle Titan. I've always wanted a Reaver in 40K-scale and now I have one!
Here is the story behind it. A couple months ago I was browsing Warhammer classifieds on kijiji (free ad website, like Craigslist) and stumbled on a guy who was advertising 3D-printed proxy Titans. I'm talking Warlords, Reavers, and Warhounds. Anyway we got together and I saw that the models were decent quality, so I got him to print me one along with some extra weapons (actually I got two, and you might see the other later in the Challenge...?)
The model required assembly of course, but not nearly as much assembly as a resin one from Forgeworld. Still fiddly in places but I would compare it to the difficulty level of the new tiny Reaver Titans from the Adeptus Titanicus (2018) game. Of course I magnetized the weapons with 3/8" neodymium magnets, which mostly worked OK.
I painted the God-machine as Legio Krytos - a Titan legio affiliated with the Iron Warriors space marine legion, which swore its fealty to the Warmaster Horus in the Horus Heresy.
Krytos was the legio in whose colours I painted my AT18 titans as well.Colours used: Vallejo German Uniform, Rakarth Flesh basecoat with Pallid Wych Flesh on the off-white bits, Leadbelcher on the metal parts, Brass Scorpion for the brass trim, Steel Legion Drab highlighted with Rakarth for the scrolls, the whole washed with Nuln Oil and Agrax Earthshade. I added some light dirt streaks with my new AK "Streaking Dirt" pencil and sponge chips with German Camo Black Brown. Dust was drybrushed on the feet with Rakarth.
Part of the coolness of Titans (and other ridiculously large war machines) is that they are all individually named. I chose "Dark Apostle" as the name of this Reaver, and that translates into "Warhammer Latin" as "Apostolus Tenebris". At least that's my best guess, anyway. The Krytos insignia on the shield is from the AT18 Legio Krytos decal sheet.
The model is actually pretty nicely detailed. Assembly was straightforward - mostly using superglue but some of the structural elements were secured with JB Kwik-Weld two-part epoxy.
How about this detail on the pistons on the backs of the legs!
Here's a good view of the Melta-Cannon arm weapon. This is actually pretty heavy (it has separate barrels inside the shroud) and the magnets I used to secure it could stand to be a bit stronger (those are on order).
I used some decals from the Imperial Knights sheet to detail the weapon.
Speaking of Knight decals, I'd wanted to use the Aquila decals from the sheet on the pauldrons, but they were way too small. So I had to freehand the aquila onto the pauldron. The small cogged skull is from the AT18 Krytos decal sheet though.
The other weapon is a very awesome looking laser blaster. I painted this to match the laser blasters on my AT18 Reavers.
More decal detail on the laser blaster.
I just HAD to put a "VIN plate" on the Titan as well.
And no Reaver Titan is complete without a massive power fist!! It was a little trickier to fit this one - I had to cut apart a spare arm piece to make a magnetized extension for the fist.
It's a big fist!!
Penetrating stare from the Reaver head. Such a cool look, but sadly there is no internal detailing here.
Group shot with my old Armorcast Legio Metalica Reaver. The new 3D printed model absolutely dwarfs it. You can see the Princeps and Moderati on the buildings in front of it. The scale of this Titan is massive.
Here's where the scale really shows. At front left is an Iron Warriors standard bearer and at right is an AT18 Reaver. The 3D printed Reaver is a little over 16" tall.
BONUS CONTENT:
To thank you for continuing through this lengthy post, here are some bonus work-in-progress pictures:
Here's a stack of parts after priming the sub-assemblies. 3D printed resin is a funny material, the parts I got leaked some oily stuff for some time after I got it, and the matte black primer left the parts rather sticky. However this was addressed with a coat of Krylon Matt Spray on the primered parts which solved the issue.
Here's the primed lower body and Apocalypse missile launcher.
Partially assembled. The model was largely painted in sub-assemblies - I left the leg plates, knee pads, shoulder pauldrons, carapace, head to be painted separately.
The print didn't really leave a logical way to connect the torso to the lower half of the model, So I had to improvise... yes, that's a cardboard McDonalds straw. Finally found a good use for one - they're certainly no good for drinking through. There was a bit of faffing involved here too. Although the prints were hollow, there's still a ton of supports inside them, so these had to be carefully drilled through to leave space for the post.
Here's the model partly painted. Even the weapons benefitted from being painted before final assembly.
I really enjoyed painting this model and I love the way it turned out. It's pretty unlikely to ever be used in a game (although there are game stats for it in GW's new Liber Mechanicum supplement for the Age of Darkness rules!) - a Reaver is worth a base 1,500 points all by itself. Maybe a Warhound would be a better game investment...?
Yeah, definitely a Warhound!


.jpg)


1 comment:
This is just awesome Dallas. What a cool project. The Reaver looks great - particularly the "penetrating stare".
Post a Comment