 |
| Present! Fire! |
I was fortunate to host Curt in my neck of the Canadian Prairies last week. In addition to fun food and wine we were able to throw down some really great gaming. For old times' sake we had a
game of Epic 40k during the Fawcett Avenue Conscripts' regular get-together. Then on Saturday night Curt was kind enough to put his stunning 28mm French Napoleonics on to the table to challenge my stubborn, charming and poorly-led Austrians and run a game of Black Powder.
 |
| Austrian line before battle is joined |
 |
| French commanders Byron and Bill scheme to overload the Austrian flank |
 |
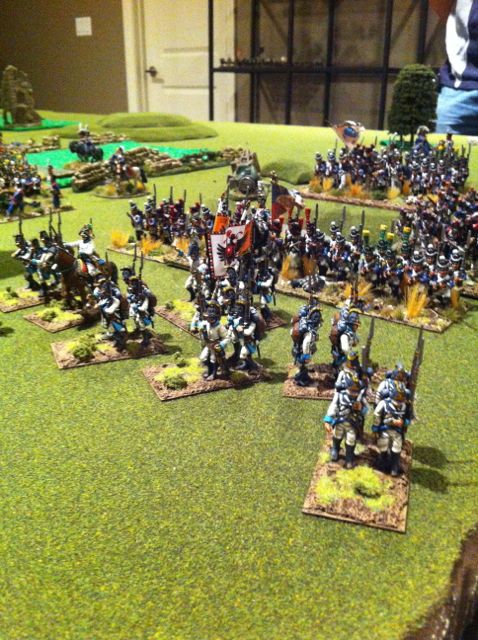
| Attack columns anyone? |
We did not busy ourselves with undue application of background. It was the 1809 campaign. A French force was looking to open the way forward by knocking an Austrian blocking force out of the way. The road to Eggmuhl? Teugen-Hausen? Aspern-Essling? Raab? Wagram? Why worry about it? Sometimes it is fun to just throw down and play, even in a period as "serious" as Napoleonics. The French would have eight turns to break the Austrians. That was that!
 |
| Austrian dragoons at the far left of the Austrian line |
 |
| The French advance, led by infantry on their left |
 |
| French officers blunder their way forward... |
To determine victory Curt adjusted the victory conditions process somewhat. The army break point would be determined by the removal of various units through battle, as usual, but we applied the Army Morale feature from the game "Maurice", where the effect of this would be somewhat random. An excellent mechanic that fit well with the game.
We also tilted the initiative mechanic on its head - it would be harder to maneuver near the enemy, not easier, so free initiative moves were limited to units at least 24" away from the enemy, not within 12" of the enemy.
 |
| A dire and ominous concentration of French troops assault along the flank of the table |
 |
| Another view of the French assault. Behind the lines, Cam contemplates just how small Dallas' chance for success is... |
The French force consisted of six battalions of infantry, a regiment of Carbiniers, a regiment of Cuirassiers and an artillery battery. The Austrians met them with a similar force - six battalions of infantry, a regiment of Cuirassiers and a regiment of Dragoons. They would face off along the opposing long edges of a 5' x 8' table.
 |
| Curt's 28mm French are a sight to see on the table! |
 |
| The extreme right of the Austrian line - Dallas holds out... |
 |
| Some Hungarians in Dallas' brigade hold out under heavy French pressure |
To further reflect the national attributes of the forces involved, the French troops were rated as "Superbly Drilled", meaning they could always count on some kind of action even in the event of a flubbed command roll by an officer (although they could not charge on their own). The Austrians had some command penalties to reflect the indecisive nature of their command structure, but their battalions were large and ready to accept some abuse in stoic defence of the Holy Roman Empire!
 |
| The assault is joined! Dallas' infantry goes down fighting... |
 |
| My artillery battery provided limited support to the Austrian line...but made the C-in-C feel better.... |
 |
| Mike's assault in the centre moves ahead |
Byron and Bill took command of the French, while the Austrian command, true to the flavour of the period, was a touch top-heavy, with Dallas taking command of an infantry brigade on the right, Mike F. taking command of an infantry brigade in the centre, and visiting Conscript Cam leading the cavalry brigade on the Austrian left, while I played the role of Austrian C-in-C, with direct control of the artillery (and a pressing concern for a lute I may have left in Vienna).
 |
| Dallas' right is broken |
 |
| Dallas' remaining troops under pressure. The French gun on the left is about to unlimber... |
The French, being the squeezers they are, overloaded their infantry toward the Austrian right. Dallas looked a little forlorn as his thin spread of three infantry battalions faced five french battalions, supported by artillery, racing to crush his men. His troops held on grimly, with Dallas hot-rolling numerous saving throws to hold back the French. Ultimately, in a slight departure from Hapsburg character, he sent his right-most battalion directly forward into the advancing French, thinking it was better to go down in flames charging rather than waiting for the inevitable.
 |
| Curt's stunning French Carbiniers |
 |
| When you roll like this, you will never, ever charge.... |
Dallas' troops held out for a long time (considering what he was facing), but at the end of the day it ended in tears, and over the space of three turns two of his battalions were routed. His stand was prolonged by the French command's tendency to roll blunders, slowing their advance through some random, awkward movements. Dallas also hit hard with his musketry, and my desultory artillery fire added a little support.
 |
| French Cuirassiers run over the Austrian dragoons |
On the left flank we braced for an epic cavalry clash. In between bouts of Hapsburg vapours, I was careful to remind Cam on multiple occasions that the fate of our whole stand depended on his horsemen. Cam was thankful for the pressure (he may have referred to it as "pre-blame", I can't exactly recall) but he embraced the role with a suitably Austrian vigour.
 |
| Victorious French heavy cavalry threaten the Austrian left flank |
And the results were...very Austrian...a prolonged standoff, extended by multiple failed command rolls, multiple failed "Follow Me!" attempts...it was really something!! For several turns, the four regiments stood there nose to nose, waiting for someone - anyone! - to get a damn charge roll off the ground. In the end I was successful first - but only via a blunder!!!
 |
| This lone French battalion held the French centre |
But once unleashed, it was a hard core battle! Cam's Austrian heavy cavalry were able to break the French Carbiniers after two rounds of hard fighting. It did not go so well for the Dragoons, who proved to be little more than a speed bump for Napoleon's Cuirassiers.
 |
| Mike rolls out against the Austrian centre |
In trouble on the left, and in trouble on the right. It was pretty dire....but in the centre - wow! Mike's Austrian infantry brigade steadily and methodically shredded the French battalions in front of them. He did so well he was able to advance forward into the middle of the French line, threatening the flank of the French infantry blocks on the Austrian right, and safe from the dreaded French cavalry on the left.
 |
| Mike's three battalions had solid momentum |
The Austrian high command was jazzed about the possibilities of this advance, but in true, cautious, conservative fashion, we withdrew. Remember those army morale rules we mentioned? Well, we rolled high when checking for the demise of each Austrian unit lost to that point, and rolling high is bad. Our army morale broken, the Austrians ceded the field, leaving the French a little bloodied and a little baffled...
|
| The French centre faces disaster...those Carbiniers at the top of the photo are already beaten.... |
It was great fun to play Black Powder again, but in the Napoleonic context it is easy to see the numerous irritations - saving throws from artillery, aaarrrrgh so stupid! - which motivated Curt and friends to develop their own variant for the period.
 |
| Mike's successful assault moves to threaten the French main thrust, just visible to the right |
Nonetheless, the game looked awesome, the company was great, and it was a real thrill to get my Austrian lads on to the table against Curt's stunning French troops.
 |
| Only Austrians would maneuver to this point, and then fall back... |
I want to thank Curt again for putting on the game - he had done a presentation at a conference that morning, made it back to my place just in time to get the game set up and then helped us bludgeon our rusty way through the game. That takes a lot of energy, and it was greatly appreciated! Thanks very much dude. I look forward to the next game!


