Friday, January 30, 2009

21st Panzer Reports Objective Captured

Rommel - "Great work gents. Cheers!"

Last night the Conscripts gathered at Dallas' place for this week's game - World War 2 in 15mm scale, using the Flames of War rules by Battlefront. The game was set in the North African theatre in 1942, during the Gazala battles, which featured many swirling tank battles among the dunes. I love a good tank battle, and as it was the first battlefield appearance for my Afrika Korps and 8th Army troops, I was really looking forward to the game.

Turnout was excellent - Brian, Mike F, Mike B, Frederick, Kevin, Dave V and Cam all came out to blow up some tanks.

The scenario featured a force of British troops from the 7th Armoured Division - the "Desert Rats" - trying to hold a small village in the hopes of blocking the rapid advance of the 21st Panzer Division. The village was the sole objective, and the Germans would have 8 turns to completely capture it. Any other outcome would be a British victory.


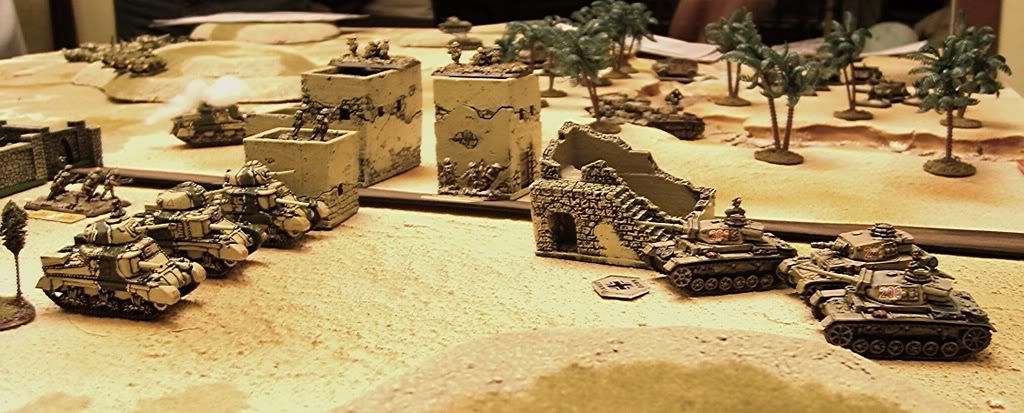
The table - objective village at upper right - Germans lower centre

The British force was comprised of two lorried motor platoons, with light mortars and AT rifles, reinforced with a Vickers HMG platoon, and a platoon of three Universal Carriers with extra MGs. For armour, the Brits had a troop of three Crusader IIs (wow - a 2-pounder!) and two troops of Grant tanks (ok - 75mm - that's better). All-in, the British force was worth about 1600 points.


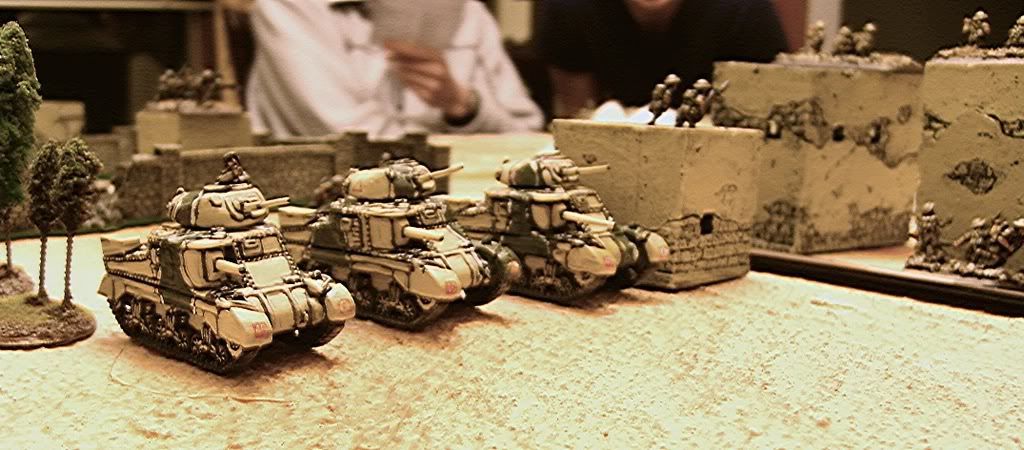
British forces start "dug in"


British in the village

The Germans had a larger force - two full-strength panzer grenadier platoons riding in trucks, a section of two 8cm GW34 mortars, a "retro" platoon of 3 light Panzer IIF tanks, and three platoons of panzers which between them contained 6 Pz IIIJs, 2 Pz IIILs (all had long 50mm guns), and a Pz IVF1 (with a "short" 75mm). The German column also contained a towed 88mm FLAK cannon. All together, the Germans outnumbered the British points-wise. The DAK detachment was around 2100 points - but the British had the advantage of starting dug-in. And the Germans had to deal with the wadi....


"Wadi ho!" - German motorized infantry race (!) across the dry riverbed

The German advance was severely constrained by a wadi that nearly all of their platoons would have to cross before they could maneuver against the village. The Germans were allowed to designate Panzer platoons for an attempted flank arrival (which would avoid the wadi) if they wished, but did not know when those would show up.

The narrowest section of the wadi was also closest to the British positions, so the Germans had to choose between a much longer/slower (if safer) crossing, or going straight at the British and coming under fire from a troop of Grants. Either choice meant difficult going, checks to bog down, and much entertainment (for me, at least).

Dallas, Frederick, Brian and Mike B took command of the DAK troops. Dave V, Kevin, Mike F and Cam rolled with the Brits.

The British dug into the village and environs, and held a troop of Grant tanks in reserve off table. As the game started, the DAK began their slow advance through the wadi. Brian took a PzIIIJ platoon on a flank march, and awaited his opportunity. Fredrick led the two Panzer Grenadier Platoons and Pz IIFs through the wide section of the wadi, looking for elbow room among the hills outside the village. A few trucks and panzers bogged down, but generally they trudged ahead. The remaining Panzers headed straight at the British, and began exchanging fire with the Grant troop that was on table.


Die Panzers Rollen in Afrika Vor!

Tot-to-toe with the Grants!

The British sat tight - Dave brought his Grants into action against the Panzers, while Mike F and Kevin pushed the universal carriers and Crusaders out into the hills in the hopes of slowing the Panzer Grenadiers.

The first point of contact was outside the main village compound, as the Panzers started to knock out some Grant tanks, and overran three sections of British infantry right in their fox holes. Dave responded with his usual agressive tactics, sending the AT rifle team and his suriving Grants hunting for flank shots (and passing the motivation checks, ensuring the Grant troop fought to the last). However, the AT rifle team missed (repeatedly) from point blank range, and the Grants managed to only knock out one Panzer IIIM before they were all knocked out.

Out in the hills, Mike F's Crusaders exchanged fire with the light panzers, knocking out a Panzer II. Mike F was hopeful of lighting up the Panzer grenadiers riding in their soft-skin vehicles, but was frustrated as ALL of the grenadiers in one platoon survived their trucks getting knocked out (nice rolling Frederick!).

Things got worse in the hills for the British as the Crusaders realized Brian's platoon of Pz IIIJs was making their flank entry, and the Germans had deployed the 88mm FLAK on the other side of the wadi. The Crusader troop was shortly reduced to wreckage. The Bren carriers made a noble stand, but were overwhelmed by fire from the Panzer IIfs, and an assault by Frederick's Panzer Grenadiers finished them off.

The British reserve Grant troop arrived, and went toe to toe over a couple of turns with Dallas's Panzer IIIJ platoon. The Mark IIIs got the better of it - the Grant troop was wiped out over two turns.

On the German side, as Frederick's second grenadier platoon - still mounted in their cool SUV-style Kfz 70 trucks - raced toward the village, they got caught by a barrage of Vickers gun HMG fire. Frederick was unable to recreate the magic of the saving throws in prior turns, and the platoon was destroyed as the survivors fled.

While the decimation of a grenadier platoon felt pretty good, the British infantry were now feeling the heat - mortar barrages rained down on the village, pinning and killing. All of their armour was knocked out. It was a question of whether they could hold out. As turn 8 approached, the infantry endured withering fire from tanks, mortars, the 88mm, dismounted panzer grenadiers, and three platoons of panzers! Command teams were killed, replaced, then the replacements were killed - one by one, the teams dropped away. Yet the British players kept passing the motivation checks!


Mortars take their toll.

Finally, in the 8th and final turn, in which the Panzers literally began to overrun the town, the British company CO failed a motivation test, and the game ended. 21st Panzer had triumphed, and would move on to the next objective. Meanwhile, senior officers of the British 7th Armoured were reviewing the warrantees contained in the lend-lease terms for the Grant tanks...

Thanks to everyone for a great turn out and an excellent game, and thanks to Dallas for hosting. Also thanks to all for demonstrating great patience for my lack of familiarity with the Flames of War rules - stupid !#$@#ing rulebook!

21st Panzer moves out to the next objective....

Wednesday, January 28, 2009

Thursday's Game


Inspired by the recent weather in Winnipeg, we go to the North African Desert in May, 1942. The Desert Fox has unleashed “Operation Venezia” against the 8th Army’s Gazala line. Rommel’s Afrika Korps has out-flanked General Auchinleck’s defences, and is pushing north-east. The game will feature troops from the British 7th Armoured Division defending a small village in an effort to stall the advance of the 21st Panzer Division. Will the new Grant lend-lease tanks make a difference against the Germans?

Come fill the desert with burning tanks as we play Flames of War, 15mm World War II.

Monday, January 26, 2009

Progress on Recent Projects - Commies, BAOR, 8th Army

Shamed by Dallas's recent postings of rapid progress on different projects, here are some new additions from my work bench.

This is a 1/56 scale BRDM AT-5 "Spandrel" ATGW vehicle used by the Soviet-era forces for anti-tank duties. The model is from Sloppy Jalopy, a company with which I have a 60/40 love-hate view. The figure beside it is one of the "Chemical Commies" from Eureka's 25mm Soviets in NBC gear line, and it gives you an idea of the size of the model.

1/56 Scale BRDM AT-5 Spandrel

Another big project has been to complete some British Army Of the Rhine (BAOR) figures. I can't even recall why I ordered them at all - probably to get the brits into the modern gaming, but then Mike F came into it in a big way, so I lost momentum. I had finished about 10 of the guys last year, and then found another 24 or so in my "pending" box. I don't really need them, but hey - why stop now?

They are from Mongrel Miniatures, and are appropriate for the 80's era. The lineup is great - they have everything from GPMGs and mortars to recoil-less rifles and MILAN teams. Compared to Eureka's half-job on the Bundeswehr line (lots of MGs, no ATGW, mortars etc) it's awesome. Only problem is that a key supplier of vehicles for this scale and army - Chieftain models - appears to have gone completely off-line recently. In particular, Chieftain provided things like Chieftain tanks (appropriately enough) as well as Scimitar recon vehicles. Sloppy Jalopy can provide FV-432 APCs, so I will probably get some of those at one point, but without armour, they will have to rely on the MILANs.

BAOR in Progress

Photobucket

Here is a work-in-progress of the "Swingfire" ATGW I ordered from Chieftain a year ago. It is the only vehicle I have to support these guys. Keeping with the finest British vehicle tradition, it is pretty awful - sardine can small, like a modern version of a Bren carrier with MILANs. Still, it should help against the Russian tanks.

Swingfire in Progress

It would be fun to use these guys for a "Berlin 85" or something like that. Still, Mike F has a much cooler modern Brit layout in terms of infantry with tanks and APCs, so maybe I will try to get these guys involved in a Falklands game. After all, I think the MoFo guys do a range of Argentine Marines, and you would not need vehicles for the Falklands.

Last but not least, I have been working on 15mm WW2 stuff for the desert. I started three years ago with the Afrika Korps guys, and have a substantial chunk of them done, and have recently moved on to the 8th army. The Brits will now have some Vickers MGs to back them up!

Photobucket

I find that the more I paint infantry models by Battlefront, the less I like them. I utterly despise the foot-thick wad of pewter at the base of every casting (makes basing much harder than it needs to be), and the features are bizarre. On the other hand, their range is pretty complete, it's easy to get, relatively cheap in some cases, and until I can sculpt my own figures, maybe I should just shut up?

Anyway, I hope to have these sorts of things coming to a table near you all very soon! Since it's so frigging cold, I look forward to some battles in the North African desert in particular.

Sunday, January 25, 2009

Pig Iron Project


A while back I posted some "in progress" shots of my Pig Iron Kolony Militia project. Now that they are done (and have been for a week or so) I thought I'd post a final "portrait" of the crew with their converted SU-300 self-propelled assault gun. Since the last update I had finished the groundwork, painted the eyepieces using a simple "gem" technique and a gloss varnish and did some general touch up and matt varnishing. The standard bearer has yet to be given his "red rag" but Brian assures me it's coming and I know it will be top-class work - he is the man behind Vaubanner Graphics (http://www.mts.net/~homenic1/vaubanner/vaubandex.html), purveyors of top-quality historical wargames flags.

This was a pretty fun project and I think I will be adding to the "army" with another booster pack of ten models to fill out the platoon to a full strength of 32.

Friday, January 23, 2009

Spice Mines of Kessel, here we come

Sollaest, Corellia System, Imperial News Service -

Notorious smuggler, rebel and terrorist Han Solo was captured by Imperial authorities yesterday after an intense gun battle.

Solo and his terror gang had stolen valuable datacards from the Imperial archive at the Sollaestian University in Sollaest City. The heist coincided with a general insurgency by fringe elements on the planet, which was swiftly put down by a fresh surge of Imperial troops dispatched to assist the Sollaestian armed forces in maintaining order.
Captured along with Solo were his Wookiee associate, Chewbacca, along with several other notorious mercenaries and guns-for-hire collaborating with the insurgents. Solo's ship, the Millennium Falcon, was also taken by Imperial forces and will be held as evidence in the civil trials expected to be brought by Solo's many victims.

Solo, a one-time fighter pilot and deserter from the Imperial Navy, was tried summarily by court-martial aboard the Star Destroyer Contemptor and sentenced to 99 standard years' hard labour in the Spice Mines of Kessel.
-------------------
Excellent turnout last night for the Star Wars game. Bill, Frederick, Mike F., and Perry took the part of the Imperial forces and Sollaestian authorities (for which I used Rebel Fleet Troopers as models) while Cam, Wes, Mike B. and Brian controlled Solo and his "terror gang" (mostly low-level Fringe characters with some hard men included in the form of bounty hunters).


the table
The terrain layout represented a portion of a University campus with many Star-Warsy-looking buildings with some green space and trees here and there, on a 6'x4' table. The Millennium Falcon was set on one corner of the table in a small park, with half of the "rebel" forces. Solo and Chewie, along with the rest of the rebels, started in the opposite corner with their objective being for both of them to reach the Falcon (major victory) or for Han to get there by himself (minor victory). The Imperials started off deploying from the long table edges between Solo and the Falcon, their goal being to prevent the victory conditions.


"our founder" on the quad

Imperials: "where's Solo?" 3PO: "Over heeere!"


Chewie walks right into it


Here they come...

The game quickly developed into two battles: Solo and Chewie vs. one half of the Imperials, and the bounty hunters vs. the other half. I balanced the points pretty much exactly in the hopes this would create a close game, and luckily this is what happened. After shooting down a few Stormtroopers, Han decided to beat feet in earnest across the table toward the Falcon. With his full complement of hit points, he was within three moves of the ship and was surely thinking "what could go wrong?"

Han gets it from behind from a "Biker" - practice for the Spice Mines?

What went wrong for Han were two Biker Scouts. With Han running flat out toward the ship, TX-436 and XK-120 both took careful aim with their blaster pistols. The chances of them hitting Han were not great, and even if they did, the 10 points of damage they cause would hardly put a scratch on Han's 80 hit points. Unless they rolled natural 20's for double damage... which Frederick proceeded to do... for BOTH of them. Best. Troopers. Ever!! Where were these guys on the Death Star??
Anyway, the 40 points of damage they collectively caused Han probably won the game for the Imperials. There were no heavy weapons left on the table so the most damage anyone could do to him was 10 points, but getting halfway home in two shots enabled the four or so other Imperials left in play to take him out within one move of the Falcon's ramp.

(As an aside, after nailing Han, both TX-436 and XK-120 were put out of action. They made full recoveries, only to be wounded again in the battle of Endor. TK-436 was clotheslined by a tree whilst chasing Leia on his Speeder Bike, and XK-120 was punched in the junk by an Ewok).


Planetary security troops fresh from obliterating a daycare centre


Dead-eye TIE Pilot and the "19" he rolled. Probot helped...

In any event, the game ended with Han being put out of action by a well-aimed shot from Perry's TIE Fighter Pilot (!) assisted by the Probot (!!). A very close game and a ton of fun. I think the table looked good, too. Many of the buildings were actually made from Sterilite baskets purchased from Wal-Mart, thanks to an idea from TMP member Inari7.

TRUCK STOP

Trucks
Overview

Corporal Parnell shifted the truck into third and reformed to cross the open space ahead of them. The Planetary Defense Force trucks quickly sorted themselves out into a double column and picked up speed across the open ground. Lance, his mechanic, tracked the heavy stubber back and forth. Suddenly he let go a long burst toward the tree line and Parnell was horrified to see attackers leap from hiding on both sides of his convoy.

“Convoy! Break! Break! It’s every truck for himself – save yourselves as best you can!” he roared into his microbead as he jammed the truck into 4th gear and stomped the accelerator all the way to the floor…

***
Last night, on 40K night at the local Games Workshop store, MikeM and I play tested the 5th Edition version of “Truck Stop” – an Astronomi-con tournament scenario. Each of the six trucks was transporting a cargo canister. The players’ job was to disable the trucks and secure the cargo canisters while preventing their opponent from doing the same. All the trucks started in a double column in the middle of the table. Each turn, in between each player’s cycle, the trucks would move 3D6” in a random direction. The cargo canisters could be seized by anything with hands, not just Troops, so Dreadnoughts with DCCWs and Wraithlords could potentially capture the cargo canisters.

Mike fielded a balanced Imperial Guard force: two platoons of infantry (60 guys!), plus attached anti-tank and mortar squads, a squad of Rough Rider (horse) cavalry, a Hellhound flamethrower tank, and a Leman Russ main battle tank. There were lots of laser cannons, plasma rifles and grenade launchers.

My Fire Prism wasn’t quite finished yet, so I stuck with my usual Swordwind semi-mechanized list: 4 Wave Serpents filled with Aspect Warriors (2 x Dire Avengers, Howling Banshees, and Fire Dragons), a two-gun Wraithlord, all led by a Farseer.

I won choice, so I chose to go second. Mike chose the table side with slightly more cover. He set up all his infantry in a gun line in craters and woods, keeping the vehicles and cavalry in reserve. Looking at all the anti-tank firepower, I used the reserves denial ploy and declined to set up. (Note: this cost the Eldar later in the game, since the Farseer and the Dragons didn’t show up until 4th turn.)

As it turns out, Corporal Parnell’s shouted order was his last. The Guard opened up with all their heavy weapons against the soft-skinned trucks. As a result, four of them were destroyed in fiery explosions, taking their cargoes, and Corporal Parnell, with them. One truck was immobilized in the middle of the table, leaving the tail end Charlie truck free to move. Carrying its precious cargo of Unobtanium ™, it turned around and drove slowly toward Guards’ right flank corner. The driver was obviously in shock from witnessing all the carnage in front of him.

The scenario allows for first turn Reserves, and the Eldar were rolling hot. Everything but the Farseer and Dragons showed up. The three Wave Serpent skimmers moved toward the centre of the table, relying on the immobilized truck and moving flat out to provide cover saves. The Wraithlord came on just left of the centre of the table edge, mixing it up with infantry directly across the table.

The Guard tanks and cavalry showed up. The Hellhound came near the Guard’s right table corner, the Leman Russ showed up right of centre. The Rough Riders came on the table on Mike’s left. The cav and an infantry squad pushed on, in a left hook. Concentrated lascannon and plasma fire blew up the Banshees Serpent, leaving 6 of them on the ground. The mortars dropped several blasts on them, leaving two of the girls alive.

The mobile truck kept going for the far corner.

The two Avenger Serpents skimmed at combat speed over the immobilized truck. They moved within mutual supporting distance, setting up for disembarking next turn. Their fire killed some Guardsmen, including two members of the Imperial Guard commander’s bodyguard. The surviving Banshees reached the immobilized truck. Ignoring the crew cowering beneath the truck bed, the Aspect Warriors grabbed the cargo canister – it took two normal infantry to carry each prize, but only one monstrous creature or walker.

The Guard’s mortars landed dead on the Banshees. Supported by heavy bolter fire from the flanking squad, both Banshees went down in a hail of shrapnel and bullets. The right hand Avenger Serpent was immobilized by the anti-tank squad’s rocket launcher and it had its turret shot off; the other Serpent was shaken. The Hellhound’s heavy bolter failed to stop the last truck.

Perhaps seeing that the Guardsmen were the only ones shooting at him, the truck driver turned around and headed back towards the Eldar side of the field.

Avengers

Going against the usual Eldar grain, the Aspect Warriors had to trade lives for time and distance. The right hand Avengers disembarked from their immobilized skimmer. A Bladestorm would wipe out the squad in front of them, but the return fire would be brutal. Their Exarch ordered a charge. If they could contact two squads, it would tie up a few Guard heavy and special weapons, and with luck they would survive, locked in combat, for a couple of turns. They must have stumbled getting out of their Serpent, since they rolled a “1” for their run move. They contacted, defeated and broke the squad right in front of them, then consolidated within 6” to keep them broken. The other Serpent moved left, setting up some left flank action next turn. Meanwhile, the Wraithlord immobilized the Russ.

The broken Guard squad ran off the table. The Hellhound fired both its flame gun and its heavy bolter at the escaping truck, doing nothing. Concentrated fire from multiple Guard infantry squads wiped out the disembarked Avengers. Guardsmen on both flanks started to run, to try and capture the remaining prizes.

The surviving truck kept on towards the Eldar, who had yet to fire at it.

At the top of their fourth turn, the Farseer and the Dragons finally showed up. The Serpent landed a plasma shell on the Rough Riders, who passed their pin and morale checks only through the presence of the Guard commander’s banner nearby. The other Avenger Serpent backed up towards the mobile truck; the disembarking Avenger squad Bladestormed the truck, blowing out all the tires and wrecking the suspension, but keeping the cargo intact. The Wraithlord moved behind the truck, wrecking the Hellhound’s flame gun with a Brightlance shot.

The Guard flanks kept advancing. In the middle, the Guard commander and the surviving Rough Riders made for the center truck. The mortars and the Russ were firing like Daniel Boone, landing small and large blasts on the Avengers, reducing them below half. Somehow, their morale held.

The Wraithlord reached into the other truck and grabbed the cargo canister. The Farseer also decided it was time to lead from the front. The Dragon Serpent moved to interpose itself between the Rough Riders and the central truck. The Dragons and the Farseer dismounted, with a clear LOS to the Guard command squad - killing the enemy commander counted for a secondary objective. They didn’t even need the Doom the Farseer cast, as the commander and his bodyguards disappeared in a hail of actinic fire.

After the Wraithlord seized the canister it could not fire any weaponry. If the game went another turn, the Fire Dragons could be vapourized by the Russ.

The death of their commander must have disrupted the Imperial Guard’s commo net. Rolling for random game length the game ended, leaving the Eldar in possession of both a single canister and the win.

***

The game was a real nail-biter and a lot of fun.

The tweaking done by MikeM and Christian to the scenario for 5th edition all seem to work. There were no ambiguities in all the various special scenario rules.

The MVP award surely had to go to the Guard mortar section, who served their weapons with great skill throughout the game.

(As an aside, if some of the protective vehicle upgrades on the Serpents are removed, that frees up enough points for me to again field a cheap, Dire Avenger-style Autarch, whose Master Strategist ability allows a bonus to Reserves rolls…)

Wednesday, January 21, 2009

Thursday Game - Han Solo and the Rebels of Sollaest

"The things I do for money..." muttered Han Solo to no-one in particular. His Wookiee sidekick, Chewbacca, growled in agreement. The two, accompanied by a few surviving rag-tag rebels, crouched behind a low wall as blaster bolts ricocheted crazily around them.

"We gotta get to the Falcon - now's as good a time as any. On my mark, cover me, Chewie. Three, two, one... now!"

---------------------------

Solo and Chewbacca had been attracted to the Core World of Sollaest by their usual motivation: the lure of cold, hard credits. Solo's underworld contact had set him up with a job: smuggle a few datacards off the Core planet of Sollaest, no questions asked, for a fat reward. Little did Solo suspect that, halfway through the job, a rebellion would break out! Throwing in their lot with the Rebels, Solo and Chewbacca fought and sneaked their way through the planet's main city, avoiding Imperial entanglements along the way. Finally they have reached the University sector, where they had left their ship, the Millennium Falcon. Only a few hundred metres from the ship, Solo, Chewbacca and the few Rebels left accompanying them encounter a force of Imperial Stormtroopers and Sollaestian Army troops. Can Solo and Chewie make it to the Falcon and escape to their off-world payday, or will they end up imprisoned in the Spice Mines of Kessel?

We'll use the tried-and-tested WotC Star wars rules and miniatures, along with some new terrain inspired by a post on TMP.

See you at my place, 7:30pm start.

Monday, January 19, 2009

Imperial Test Model

I wrote this morning about testing out a colour scheme for my Epic Imperial Thunderbolts, based on the Korean War USAF F-86 Sabre. Here's my attempt:
I'm pretty happy with it, except that there doesn't seem to be anyplace to put the Imperial eagle... I was hoping to put it either on the wing surfaces or on the rear fin. Oh well.

Lazy Sunday

So after cleaning the house on Sunday, I was looking for something to do. Inspired by fellow blogger Ethics Gradient (http://anotherslipperyslope.blogspot.com/), I'm starting (in a limited way) some Imperial and Ork airforces in Epic scale. On Saturday I had bought a pack of Epic Ork Fighta-Bommas at a local shop and I decided that this would be just the thing for a Sunday evening project.

I'd also decided that the "theme" of my air forces will be based on the jet fighters of the Korean War. I always really liked the look of the Mig-15s and F-86 Sabres and I have already collected and painted a lot of 1/300 Korean War aircraft, so it was a natural!

The Orks will be the North Koreans, of course. Even the design of the Fighta-Bommas lends itself to this, they have a very "cockpit-forward" orientation and a chunky design that puts me in mind of a MiG. Plus, the Orky red colour scheme suits a North korean theme, too.

The Imperials will be the Americans. I haven't decided whether to paint the Thunderbolts in a bare-aluminium Sabre scheme, or to go with something a bit different. The design of the Thunderbolt, with its very long nose and its cockpit at the base of the rear fin, reminds me of the Corsair... so a US Navy blue scheme is an option. But Corsairs weren't jets, so that would screw up the "1950s jet combat" angle. I'll likely paint a test shot in aluminium with yellow accents, similar to the Sabres in Korea, before I finally decide.

Anyway, here are some Ork planes:

Photobucket

Photobucket

Photobucket

Photobucket

Of course, after painting the planes I still felt like doing something hobby-related, so I decided to make some 6mm terrain out of old junk I had in my bits box. This will also further my Epic air force project as they can be used for objective in bomb runs, etc.

The structures represent chemical plants, power facilities etc. I used some bits of old model kits (mainly engine parts for 1/48 tanks that I never used, because I don't display the engine), some plasticard, and a few safety caps off syringes and old insulin vials I had around (the cat is diabetic). Here's what I ended up with, before priming and painting:

Photobucket

and with some Epic-scale building for size reference:

Photobucket

Like I said, just a lazy Sunday ;-)

Friday, January 16, 2009

Vimiero Photos


The battlefield from the French perspective: town of Vimiero is at upper left (the two-sector town)


British line infantry and skirmishing riflemen in defensive positions west of Vimiero.


British brigade (centre of photo) moves to cover the approach to Vimiero.


Chaos as the French brigades smash into their opponents on high ground to the east of Vimiero.


British brigade attempts to defend Vimiero against French converged grenadiers... EPIC FAIL

Here are some photos to accompany Greg's excellent battle report, below. Good times for the French. For the British... not so much.
"Not your fault, Sharpe. Not your fault at all."


Battle Report - Shako II Scenario - Vimiero, 1808


Junot to Wellesley - "How do you like me now?"

Last night we gathered at Dallas' place to play a game the Conscripts had not played in quite some time - 15mm Napoleonics! The rules were Shako II, and the scenario was the battle of Vimiero from August of 1808, which pitted a small British force commanded by General Wellesley attempting to hold a line of hills against an ambitious attack by the French commander Junot.

Dallas, Mike F, and Frederick took command of the British forces, confident they would enjoy a Sharpe-novel style battle where the British infantry, fighting in line (of course) hose down the French attackers with lethal musket volleys. Bill, Brian and myself took the place of the French generals, taking a momentary break from hauling away the dinner suite of the Portuguese royal family to try and knock the British out of the Peninsula all together!

The scenario, from the original Shako scenario book "Fields of Glory", featured many small "divisions" (actually small brigades) on both sides and starting positions which placed the opposing commands very close to each other, so the action was almost immediate. Frederick took command of two brigades on the right of the British line, Dallas had another two in the centre, and Mike had two on the left. Dallas also had a brigade off-table, ready to make an entry on the extreme left of the line later in the game.

For the French, Bill and Brian each took command of two brigades on the left of the French line (facing Frederick and Dallas). They were small, but included a good-size contingent of converged grenadiers, which would give the force an elite heft. I had a brigade on the right (facing Mike F and part of Dallas' units), and also a brigade under General Brennier (hereafter referred to as General "WHAT-ever") which was going to be making a flank arrival (against the left of the British line) at a random point in the game. The French also could call on a good-size cavalry division if needed, but doing so would lower the victory level.

The participants will recall that my recollection of game turns passing was utterly daft (my apologies again Bill), but generally the British held firm on their left, holding high ground against Brian and Bill, but in the centre and the right of their line, they advanced (perhaps preferring that high ground to the high ground they were already occupying). This caught me by surprise, and brought my brigade into contact with Mike F almost immediately, while Brian and Bill moved forward under artillery fire and attention from the green-jacketed 95th rifles in skirmish formation.

On the British right, Frederick and Dallas were scoring kills and staggers with artillery, and even some kills with skirmish fire. Brian's formations replied in kind, and between Bill and Brian, one of Frederick's divisions was soon in a morale-testing state. Frederick rolled high enough to keep them on the table, but with many penalties, which would hurt in the close assault. On the French side, Brian passed morale checks handily.

When the moment for melee came, the dice were not favourable to the red (and green) coat cause. Shako II punishes you for missing a point-blank volley at units which are charging, and the Brits had the misfortune to miss most of their volleys, earning a penalty for the melee which followed. The dice were not much kinder in the melee, and the converged grenadiers were soon occupying the high ground.

In the centre, Dallas advanced to cover the town of Vimiero against more French grenadiers from Bill's command, but the grenadiers (backed by the French army battery) ultimately drove them away, and the division broke, leaving the road to Vimiero open.

On the British left it was a clash between my divisions(the largest ones the French had) and Mike F's crack troops, backed by the other half of Dallas' command. I earned some staggers and sucked up some hits from artillery, but the British muskets were remarkably ineffective, and "Operation Dumb Luck" proceeded like clockwork. The artillery gunners in my division, after firing blanks for several turns, located some sort of experimental depleted-uranium case shot and hit the Brits very hard. Up next - roll a "six" for initiative, giving me the chance to remove a stagger that otherwise would have been a hindrance. Step three - close assault against a British line in a superior defensive position. Step four - British fail their point blank volley. Step five - barely win the melee, enough to drive the buggers back!!

On the extreme left of the British line, much entertainment from late-arriving units. Mike F was working to envelop my division in the hills when General WHAT-ever showed up practically right behind Mike's left flank. While Mike did his best to position the units to react to the new threat, the Shako II rules are once again rather merciless. Vegas-level initiative rolls saved them from utter destruction, but the British artillery was charged by cavalry from the rear, and the guns were wiped out. I smelled blood...

Then Dallas shows up with the bloody Portugues Cacadores on my flank!! Dallas' troops smelled blood (I smelled something else) but rather than assume any sort of logical defensive position, I decided a second phase of "Operation Dumb Luck" was in order. I sent a solitary batallion against Mike F's last division. Bill had advised that initiating a melee without staggering the opponent first was dangerous, so I took care of that with some handy skirmisher fire (dumb luck again) and proceeded to win the melee (further dumb luck) after (you guessed it) the British missed their point blank volley!

Dallas still sensed the chance to thump General WHAT-ever, and his Portuguese battalions surged forward, only to be stopped dead by - you guessed it - French musket fire! The staggered units would be exposed next turn to a charge by rested French cavalry in the next turn....


At that point, we called the game at (I think) the end of turn seven (or so). The road to Vimiero was open, two British divisions broken, two more in danger. In the end, British lines holding the high ground are not that threantening when they fail to hit the broad side of a barn with their volley fire. Vive L'empereur!

As a post-script, when collecting the figures after the game, we noticed that we had not deployed the British cavalry (a solitary regiment of light dragoons)! It kind of summed up the night for them. Likely they could have intervened against Bill's grenadiers, and kept the French out of Vimiero, but more likely would have been covering Wellesley as he ran for the boats!

Thanks to all for a great game, and thanks to Dallas for hosting. It was great to get back to Napoleonics once again.


Thursday, January 15, 2009

Thursday Game


Vimeiro, Portugal... 1808.

As Napoleon holds continental Europe in thrall, the British have landed a small army in Portugal under the command of Lt. General Wellesley to try and turn the tide. The French commander on the scene, Junot, decides to attack before this trifling contingent of hooligans is reinforced further. Surely the armed forces of a nation with such an awful taste in food cannot prevail against the attack columns of the Emperor?s Grande Armee!

As the French make their move, Wellesley deploys his army in the hills near the town of Vimiero, ready to defend the disembarkation point of the British reinforcements.

We'll be rolling out the battle in 15mm, using the recently released "Shako II" rules. See you at my place, usual time.

Home Made 6mm Rules

This week Mike came by for a game where we experimented with some home-made rules for 6mm. I'm trying to find some rules that will run a little faster and smarter than Cold War Commander (in which you roll 56 dice just to pin one model - give me a break!) but does not go all the way back to the rigorous and not-very-entertaining-from-player-point-of-view rigour of the Spearhead engine.

Mike's British, fresh from their hard-core performance last week, delivered another thumping - this time setin the late 80s against a Soviet Motor Rifle regiment with attached tanks. The T-72s in particular were thoroughly ventilated by the Challengers.

As for the rules, I think they were OK, making improvements in some important areas, but they are still not ready for prime-time. More tweaking will be made, at which point I will hope to bring them out for full-blown Fawcett Avenue testing!

Here are some pics.

Photobucket

These BMP-2-equipped Motor Rifle soldiers are hoping against hope that NATO air power does not materialize. As you see below, it didn't work out.

Photobucket

Mike's Challengers were rock-solid. Next game, I'm going to write a scenario where the buggers are low on ammo or something...

Photobucket

Tuesday, January 13, 2009

25/28mm French by Mike F


Mike F has been busy painting (take note, Cam) and has now completed a substantial force of ultra-modern French troops. We look forward to seeing them on the table soon. To quote Mike, all he needs is a squad of French generals....
Troops by Dadi & Polombo (sp?), VABs by Solido, and the Leclerc by Kitech.
Keep up the great work Mike!

Monday, January 12, 2009

French Reinforcements

Photobucket

Over the weekend I completed a second unit of Perry French - this one features some metal command figures - a mounted Colonel, and a metal drummer and eagle bearer (the boxes only come with one set of command).

2nd Battalion

Here is the whole group so far. Slowly but surely...

Sunday, January 11, 2009

Pig Iron's Progress


Had a chance to do some more work on the Pig Iron Kolony militia...

Highlighted the Catachan Green with a mix of CG and Camo Green. Trousers are layered with Desert Yellow, and gloves and masks done with Fortress Grey over Codex Grey. Now it's just the ammo pouches and weapons to paint, with likely a wash of Devlan Mud to bring it all together, and some final work on the eyepieces and helmet sights. Almost there.